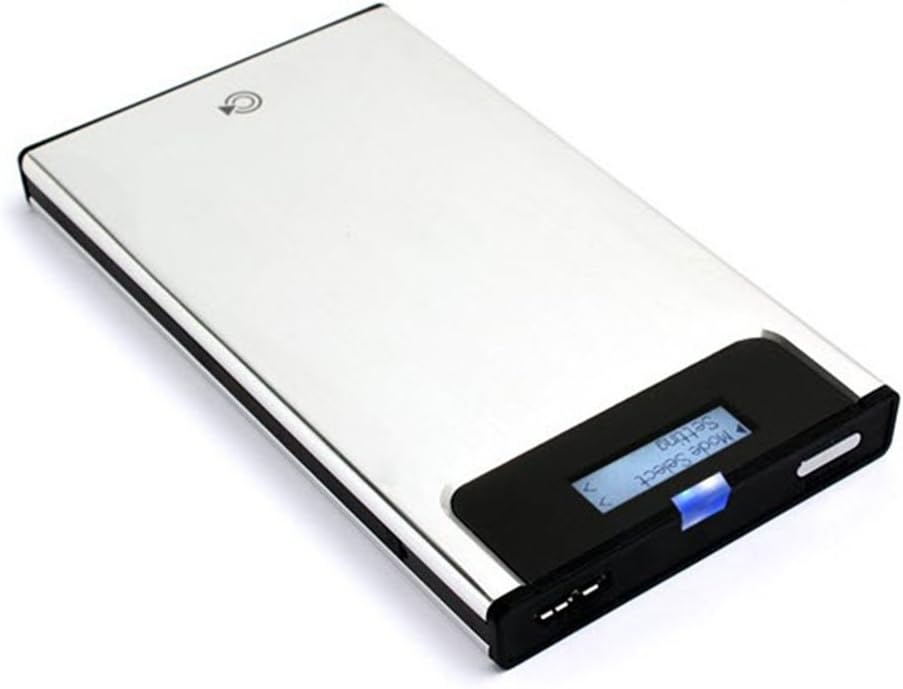


IODD 2531_Secure HDD Enclosure_Silver_Made in Korea
Product ID: 17565332
Details
- BrandYZJSM
- ColorSilver
- Compatible DevicesLaptop
- ManufacturerYZJSM
Review: This should be in every techs arsenal - Every tech should have one. Easily the best interface among the small market of external storage with CD/DVD simulators. Mounts ISO's like a champ and the ability to write protect it makes it invaluable when cleaning infections. Lets you carry a huge collection of ISO's and other files in one easy to handle package. Review: Getting Started with OS X - There is no manual included in the box and the manual available online wasn't very helpful for me. I also purchased a SanDisk SSD Plus SanDisk Internal SSD 120GB 2.5-Inch SDSSDA-120G-G25 when I ordered the IODD 2531 for use with the IODD. The first challenge I had was I couldn't figure out how to open the case to install the drive. I eventually found a manual in Korean that had some helpful pictures (the English manual I found was for the 2541 and drive installation works differently for it. I am attaching a clip from the manual to help you out. I used the spacer that was included with the SanDisk to minimize the stress put on the SATA connector because the drive is not screwed in and is only supported by the connector and the sides of the case. The second problem I had was with formatting the drive. The English Manual for the 2541 offers instructions for how to format in Windows and suggests NTFS. OS X doesn't have good (any?) support for NTFS. Fortunately the drive works just fine with FAT or ExFAT. I chose ExFAT because it allows for files larger than 2GB (I suggest you do the same, DVD images are often over 2GB). There also is not any support for GUID Partition Table (GPT), the preferred partitioning scheme for OS X, so use Master Boot Record (MBR) or you will get "1st Partition: EE". Here are the steps (for El Capitain, your interface may be slightly different): 1) Connect IODD with the provided cable 2) Open Disk Utility 3) Click on the entry on the left that is named something like "iODD External HDD Media" 4) Click Erase 5) Set Format: ExFAT 6) Set Scheme: GUID Partition Map 7) Enter a name for the Disk (you will see this name in the Finder when connected) 8) Click Erase 9) Profit When I was trying to get all of this to work I updated the firmware with VMWare and a Windows image. It worked but I was scared that I bricked the device at one point. I'm not sure I would risk it again.
| ASIN | B00T66HEJ4 |
| Brand | YZJSM |
| Color | Silver |
| Compatible Devices | Laptop |
| Customer Reviews | 4.7 out of 5 stars 4 Reviews |
| Manufacturer | YZJSM |
| Unit Count | 3.2 Ounce |
B**K
This should be in every techs arsenal
Every tech should have one. Easily the best interface among the small market of external storage with CD/DVD simulators. Mounts ISO's like a champ and the ability to write protect it makes it invaluable when cleaning infections. Lets you carry a huge collection of ISO's and other files in one easy to handle package.
B**W
Getting Started with OS X
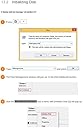
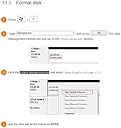
There is no manual included in the box and the manual available online wasn't very helpful for me. I also purchased a SanDisk SSD Plus SanDisk Internal SSD 120GB 2.5-Inch SDSSDA-120G-G25 when I ordered the IODD 2531 for use with the IODD. The first challenge I had was I couldn't figure out how to open the case to install the drive. I eventually found a manual in Korean that had some helpful pictures (the English manual I found was for the 2541 and drive installation works differently for it. I am attaching a clip from the manual to help you out. I used the spacer that was included with the SanDisk to minimize the stress put on the SATA connector because the drive is not screwed in and is only supported by the connector and the sides of the case. The second problem I had was with formatting the drive. The English Manual for the 2541 offers instructions for how to format in Windows and suggests NTFS. OS X doesn't have good (any?) support for NTFS. Fortunately the drive works just fine with FAT or ExFAT. I chose ExFAT because it allows for files larger than 2GB (I suggest you do the same, DVD images are often over 2GB). There also is not any support for GUID Partition Table (GPT), the preferred partitioning scheme for OS X, so use Master Boot Record (MBR) or you will get "1st Partition: EE". Here are the steps (for El Capitain, your interface may be slightly different): 1) Connect IODD with the provided cable 2) Open Disk Utility 3) Click on the entry on the left that is named something like "iODD External HDD Media" 4) Click Erase 5) Set Format: ExFAT 6) Set Scheme: GUID Partition Map 7) Enter a name for the Disk (you will see this name in the Finder when connected) 8) Click Erase 9) Profit When I was trying to get all of this to work I updated the firmware with VMWare and a Windows image. It worked but I was scared that I bricked the device at one point. I'm not sure I would risk it again.
A**D
Works perfect with SSD
Works exactly as advertised, very easy to operate. I used it with an SSD drive. This product is very useful for installing certain linux distros and especially those such as pfsense, smoothwall, or other BSD related distros that require cd rom installation.
M**Y
Here is how to fix the 1rst Partition EE error
I really love these devices. However, I made the mistake of leaving the Write Protection off while installing a Linux OS and it whacked the IODD drive: Here is how I got the firmware to see the drive and _iso folder. ------------ How to fix the 1st Partition EE error 1. Delete all the partitions (MiniTool Partition Wizard) 2. Make the disk MBR Open Command Prompt as an administrator and type diskpart. Type list disk and press Enter. Type select disk 1 if 1 is the GPT disk. Type clean and press Enter. Type convert MBR and press Enter. Type exit to close Command Prompt after it's done. 3. Create the partition create part primary select part 1 active 4. Bring up computer management in Control Panel (storage) format disk NTFS name (I use ZALMAN) set a drive letter (i) or something logical (screen now says no iso) open File explorer and create _iso load up some iso's and do a safe disconnect plug it in and now select which iso. recommend to write protect when in use.
Trustpilot
2 weeks ago
2 weeks ago