


MiOYOOW TJ-56-428 4-Digit Digital DIY Clock Kits with Acrylic Shell, DIY Alarm Clock Soldering Practice Kit for Students and DIYers, DIY Electronics Kit for Learning Electronics
Details
- BrandMiOYOOW
- Color4 Digit Clock
- Display TypeDigital
- Style经典的
- Special FeatureTimer
- Product Dimensions3"W x 0.9"H

Description
⏰ Build Your Time, Build Your Skills!
- 📚 COMPREHENSIVE MANUAL - Includes a QR code for easy access to detailed assembly instructions.
- 🔧 DIY LEARNING EXPERIENCE - Perfect for honing your soldering skills while creating a functional clock.
- 🎓 IDEAL FOR STEM EDUCATION - A hands-on project that enhances understanding of electronics and mechanics.
- 🎨 STYLISH DESKTOP ACCESSORY - Once completed, it doubles as a chic addition to your home office decor.
- 🌟 LIGHT CONTROLLED BRIGHTNESS - Automatically adjusts display brightness for optimal visibility.
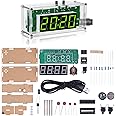
The MiOYOOWTJ-56-428 4-Digit Digital DIY Clock Kit is an engaging electronics project designed for students and DIY enthusiasts. This kit allows users to assemble a light-controlled temperature clock that displays time, date, and temperature, while also featuring customizable alarm tones. With clear instructions and a focus on practical skills, it's an excellent choice for educational settings and personal projects alike.
Specifications
| Brand | MiOYOOW |
| Color | 4 Digit Multifunctional Clock Kit |
| Display Type | Digital |
| Style | 经典的 |
| Special Feature | Timer |
| Product Dimensions | 3"W x 0.9"H |
| Power Source | DC |
| Room Type | Home Office |
| Shape | Rectangular |
| Indoor/Outdoor Usage | Indoor |
| Material | Acrylic |
| Theme | Music |
| Frame Material | Acrylic |
| Are Batteries Included | No |
| Item Weight | 2.4 ounces |
| Alarm Clock | Yes |
| Watch Movement | Mechanical |
| Number of Items | 1 |
| Operation Mode | Automatic |
| Manufacturer | WHDTS |
| UPC | 761064429632 |
| Part Number | GY20029 |
| Item model number | GY20029 |
| Size | Medium |
| Item Package Quantity | 1 |
| Special Features | Timer |
| Included Components | electronic cpmponents |
| Batteries Included? | No |
| Batteries Required? | No |
Reviews
A**N
Great Clock Kit to Build
First, I like Clocks. I have many in my collection and I wanted to see what a <$10 kit would be like.Overall, this is a great kit that was easy to build (solder) and works well. There are only a few discrete parts, the circuit board is clearly marked, the solder mask is of high quality, and I found no mistakes or errors in the circuit. It went together in about 45 minutes and has been reliably clocking time since I powered it up. As of this review, it has been running for 24 hours so I can’t yet say how accurate it is. However, it is based off a 12 MHz clock with digital circuitry so I expect it to be reasonably accurate. The instructions packed in the kit are in English & WHDTS emailed a 9-page manual (PDF) a day after the kit arrived which details both the build steps & how to operate the setting functions. If you use the detail PDF, be aware that page 4 shows a circuit board that is not the clock kit. I think page 4 was meant to show the orientation of part #5, the PR1 Network Resistor, which must be installed with the Dot next to the square box (to the left as viewed from the front) on the circuit board. If this part is in backwards, the clock probably won’t operate. The photo on page 5 is correct. I think someone just inserted the wrong picture on page 4. As a somewhat experienced kit builder, I was pleasantly surprised to see they included a socket for the main integrated circuit chip. Many inexpensive kits omit a socket which means any debugging or part placement checking is more difficult. A few of the parts must be installed in a specific orientation so look at the photos, the parts, and double check your placement before soldering.One final thought. The clock and alarm setting steps are fairly long since you have the main time and two alarms. Read the steps thoroughly and be prepared to start over if you make a procedural error. After a couple tries, it can be set easily but the 1st time through might be confusing. The designers thoughtfully made the clock show which menu step you are in as there are 10 or 11 steps to follow.
J**H
Good Clock, Enjoyable Kit
As a kit:I would call this an easy to intermediate assembly.The silkscreen is very easy to understand, and pretty much explains everything you need to know to assemble the kit.If you have any questions about it, the manual is useful, but not a be-all end-all.A small amount of knowledge of how to read a silkscreen is necessary to enjoy the assembly process.I enjoyed the process.If you plan to carry it around, you might want to conformal coat the solder side.As a clock:Once you've built it, you'll have an hours:minutes:seconds 24 hour digital clock to enjoy.This thing has more features than many desk clocks, and is rather quite useful, even if the UI can be a little confusing.Fortunately the manual does adequately explain enough that you can figure out everything else via experimentation.There's a convenient connector on the front that provides low-current 5v signal when the alarm buzzer is active.The manual cautions against going above 12v input, however the 78L05 regulator on the input accepts up to 35v.I don't know why you would want to apply 35v to your clock, but you can.I use it on a 2S LiPo battery. You'll want a battery monitor if you use a higher cell count LiPo.Clock Mode>As you power up your kit, you'll be greeted by the Clock screen.HH:MM:SS, with seconds incrementing and the colons flashing at 1Hz. Buttons S1 and S2 don't do anything. S3 changes modes.Time appears accurate. It only deviated by about two seconds from my watch over the course of a full day. I would trust this as an accurate clock.Timeset mode>Press S3 to enter Time Set mode. You'll see the time from before, but now all six digits are flashing. Seconds continue incrementing. Use S1 to increment the minutes, and S2 to increment the hours.Alarm Set mode>S3 from timeset mode sets the alarm clock. You'll be presented with a time on the display, with the colons steady.Use S1 to increment the minutes, and S2 to increment the hours. Continue past 23 hours (11PM) so the display shows --:--:-- to disable the alarm clock outright.Countdown Timer>S3 from Alarm Set activates the countdown timer. It remembers the set-mode you last used, but not the time you set.This could display any number of 0's with no colons, and the buzzer may sound.Press S2 to cycle through the digits, and S1 to increment the selected digit. HH:MM:SS, maximum value 99:59:59. Cycle past the last digit to activate the count-down. S1 doesn't do anything during the countdown.Stopwatch>Cycle past the countdown to display 00:00:00. This is a simple stopwatch. MM:SS:1/100's. Maximum value 59:59:99, cycles around if it overflows.Press S2 to start and stop the timer. Press S1 to reset.Counter>Press S3 from Stopwatch to get a simple counter. 00 00 00 with no colons will appear on the display. Theoretical maximum value 999999, but I'm not patient enough to find out.Press S2 to increment. S1 to reset.
Common Questions
Trustpilot
4 days ago
2 months ago
