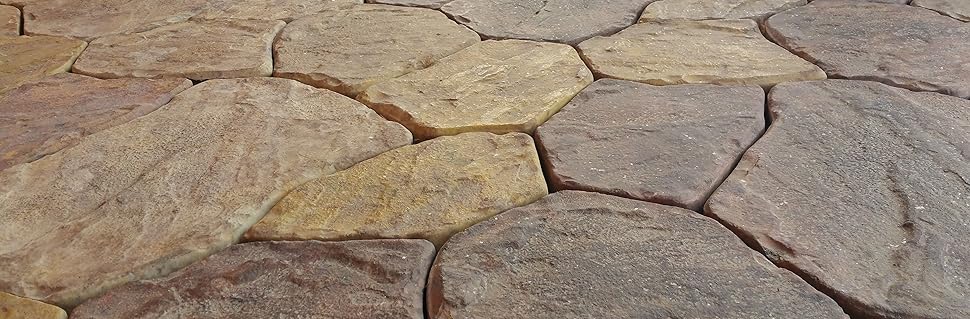
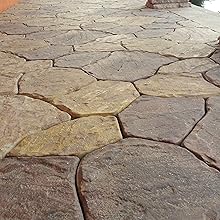
🌿 Elevate Your Garden Game with DIY Paving Magic!
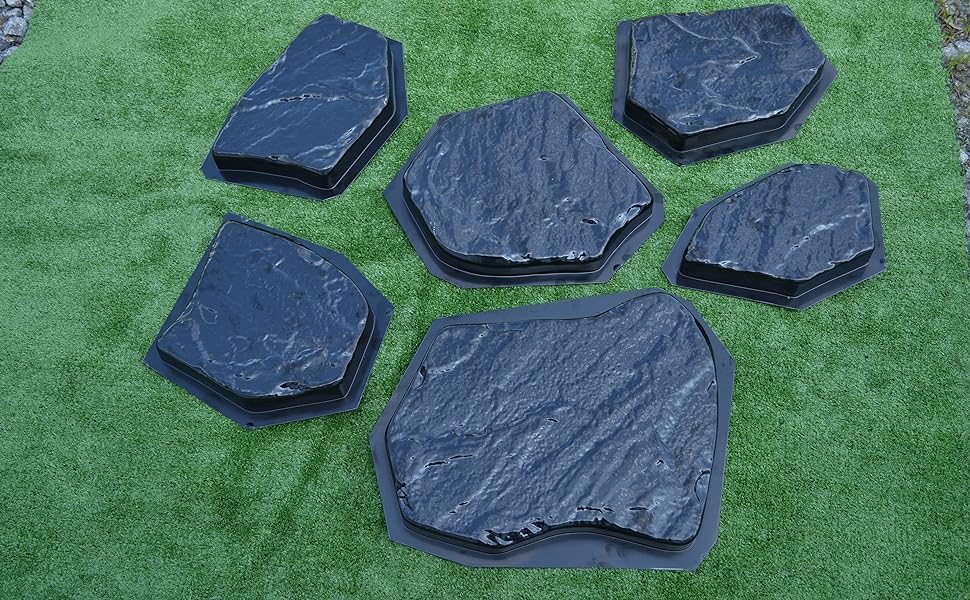
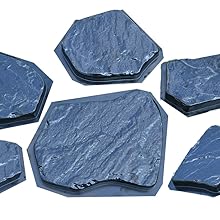
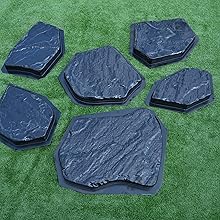
The SvitMolds Concrete Molds set includes 6 durable ABS plastic molds designed for creating beautiful pavement stones for your garden paths and patios. Each mold covers an area of 0.37 square meters and features various textures, allowing for personalized designs. With a thickness of 38 mm, these molds are reusable and can be painted in any color to match your outdoor aesthetic.
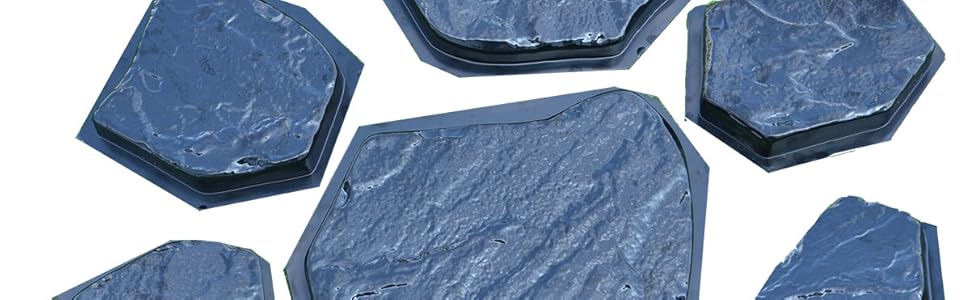

| Material Type | Plastic |
| Item Shape | Square |
| Color | multi-color |
C**T
Great advice in reviews.
Followed the advice in the reviews. Found a matching mold from same company for a larger one in a single pack to go with the set.
C**Y
They work fantastic!
So!!! The molds work fantastic!! And, my husband told me that he is super surprised and super proud that i did this by myself and i feel super accomplished and i praise God that it is almost finished. we had this patch of yard that leads from the downstairs patio out to the fence that just looked terrible and when it rained it got muddy...But, it is a project that is hard work! And I didn't realize how hard until after the first day when i worked my butt off from morning til dawn.. But it only took me 3 FULL days of HARD work to lay the path.. which I am adding flower bed borders and planting monkey grass that will fill the edges..I loved the reviews they were helpful in use...So the molds are very easy to use.. here is my suggestion...Get a mixer because I hand mixed all of the cement myself with a bucket and paint stick ... I used 3 types of cement and mixed them together... two that dries quickly (30 mins) . one all purpose that did not have gravel but dries quickly, and the two other has gravel but one dries quickly and the other can handle heavy weight...I also used 3 colors of concrete dye... and mixed the different colors with different stones... i used charcoal, buff, and brown for the colors.. in total I used 9 bags of concrete..But I do not recommend hand mixing.....my hand and wrist hurt!!! But it was the only way to mix the colors the way I wanted and also because the concrete dries so quick i was able to have a little assembly line for myself ... when one stone dried i would pop the stone out of the mold and mix another batch...I am a middle aged woman... and I was determined with my hot flahes and all...lolIt is harder than it looks but the work paid off because I love how my path looks.One set worked fine.. no need in buying 2 sets of molds..Before mixing concrete, paint each mold with oil.. cheap oil works fine .. get a good layer of oil but don't over oil... it messes the stone up and some cracked but I used the broken edges to fill the gaps in the path... demolding was not a problem for me i held the dried stone upside down and tapped the edges of the mold to release and it worked great..I hand made each stone ... love the final look...
C**G
Fun and easy! First try successes and mistakes
My first try came out nice enough to use in my project. I think I have some great tips derived from my lucky choices and stupid mistakes.Successes.1. Oiling: I read a couple of reviews before I started and decided to follow the advice of using, used frying (peanut) oil. I wiped the moulds thoroughly with a soaked paper towel; not dripping. I think heavier oil is better than lighter(?).2. Demolding: I have no idea why anyone has had demolding problems. I flipped the moulds over, held the edges with my fingers and put light/medium pressure with my thumbs and slowly worked the slab out. It took me no more than a minute for the most difficult one.3. I used Sand Mix concrete. I have no idea if normal concrete would work as well, but for the slightly higher price, my first attempt worked out, so I'm sticking with it.4. Colorant: I used Quikrete Liquid Colorant. Another poster mentioned that the color at 1/2 bottle per 60/80lbs of concrete is overkill. I second that! I used about 1/3 bottle and it's too much for my taste.5. Bubbles (lack of): My BEST tip! For a shaker table, I used a 1/3 sheet of plywood on a 2x4 frame and caster wheels. My idea was to slosh the molds back and forth. That worked OK, I saw a few bubbles rise, but then out of the corner of my eye I saw my SDS-Plus hammer drill. I powered it up and set to the lowest setting, and applied it to the table bed. Wow! bubbles popped up like the concrete was made with carbonated water!Mistakes:1. Mixing Concrete: I planned to mix the concrete in a 5-gal bucket with a drill mixer. When I started to pour the concrete in, at first it was great, but then a few concrete chunks feel into the mix and it was near disaster. It splashed everywhere. I recovered by transfering to a wheelbarrow and spade shovel. It took a lot of work to eliminate the chunks, but as my picture shows, it wasn't a total loss. My tip is empty the concrete into the mixer or tub dry, eliminate chunks and then add colored water.Bottom line:The moulds are over priced, but they work very well. I'm a DIYer to the end and I am having a lot of fun. I understand posters who said they wish the moulds were less expensive, so they could produce the pavers more quickly. As for me I have the rest of my life to perfect the art. I plan to experiment with varying the color shades in the stones to make them look more natural.
E**H
Beautiful.
We have two sets of these and they make beautiful flagstones! We put a little concrete color in the sand mix concrete and they turn out great. Use oil or a release agent in the forms. You have to get the bubbles out after pouring by knocking them against the ground for several minutes each. Some people have made vibrating tables to accomplish this, but we have 2 or 3 of us repeatedly shaking and gently dropping the forms onto the pavement after filling. Do it longer than you think...
S**R
Demold huge Pain In the Rear
EDIT:Gave up after yesterday's hour plus to demold the 6 pieces & ordered 1.25 tons of genuine flagstone. It is not worth the aggrevation with demolding time... even using a blow dryer to heat the mold in attempt to make demold easier.=====================While we really like the molds, they are a bit overpriced though an undisclosed fact is they are shipped from Ukraine; thus the difference in Amazon text have it next week but reality is much longer & shipped in a way where tracking is non functional.Demold is a real pain. Takes us about half hour to demold the entire set. BTW, just found that a hair dryer to heat the mold helps immensely if you get out of the wind to apply the heat.
Trustpilot
1 week ago
1 month ago