🔥 Stay Cozy, Stay Connected!
The FLOUREON WiFi Thermostat is a versatile and modern heating control solution, compatible with electric heating systems. It features app control for remote adjustments, a programmable schedule for energy efficiency, dual heating sensors for optimal performance, and a user-friendly LCD touchscreen. With a commitment to customer satisfaction, it offers a 60-day refund and 18-month exchange policy.
Brand | FLOUREON |
Model Number | 269750702-FLOUREON |
Colour | Wifi |
Product Dimensions | 8.5 x 8.5 x 1.2 cm; 190 g |
Voltage | 240 Volts |
Material | Iron |
Special Features | Programmable |
Item Weight | 190 g |
R**N
Does What it Should: Good Value Alternative to More Expensive Wifi Thermostats
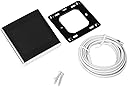
I'd been looking at getting a Wifi enabled thermostat for quite a while, various makes, all way more expensive than this product. We have a sealed system gas fired central heating boiler, and reading the description, it seemed that this thermostat wouldn't be suitable to replace the existing analogue stat. That said there were a number of reviews that said it had worked as a direct replacement for an older stat, so I had hope that it'd work for us too!I thought for £33.00, if it works great, if it doesn't, it's not the end of the world. Luckily you can ask questions here on the product page on Amazon, and after a few answers, I finally hit the jackpot when some helpful chap said that it would indeed work, and even told me how to wire it.So the stat arrived, and I set about removing the old analog one. Our three wire set up was a Live, a Neutral, and a Switching Live. The new stat is intended as a controlled for underfloor heating, so it has a Live and Neutral in to power it,, and then it has a switched Live and Neutral back out to power an heating element. Obviously I didn't want it to do that, just to switch on the boiler, when the stat calls for heat. Anyway I'll get to that part later.I'd recently had the analog stat off, as I'd tiled the hallway. The cable length out of the wall was already cut to the minimum, and whoever wired it hadn't much choice as the old Sunvic thermostat had little space in it for excess cable. So now with 10mm of tile and adhesive, the amount of cable I had to play with wasn't a lot, so I'd have to add cable to get it to reach the new digital stat.I bought a 30mm back box to fit to the tiled surface. Others said it'd worked, so I plumped for that depth. Unfortunately the connector part of the new stat sticks out just over 28mm, and the wires go directly into the back of it, so with my strip connectors, there just wasn't any space to make it work. So back out to buy the next size up, which was 40mm depth. I wasn't happy with this, as it sticks out by a royal mile, but I had no choice.This time there was the space to fit it in, but here I found my next problem. Like other screwless sockets and light switches that I've fitted before, they have a metal backplate that screws to the steel back box, or as in my case, a plastic moulded box. Unfortunately this wouldn't work as when I tried to fit the backplate, it was in effect sunk into the moulded back box, and for obvious reasons it needed to be flush with the face of it, to clip the thermostat onto it. So here was the next nightmare. Ultimately I packed off the back plate with washers to bring it flush with the surface. Just another note here the screws supplied were not standard UK spec screws, but luckily I had some 3.5mm ones in my toolbox.So now with the backplate packed off, I was able to just about clip the main stat to it, but it was an absolute pain getting the backplate to be at the right level.Even if I'd had the option to set it in the dot and dab plaster (wouldn't have had the depth regardless without smashing away the blockwork below), fitting a steel back box would have to be fitted flush with the surface of the plaster to get it to work.Right onto the wiring side of things. Like I've mentioned I had to extend the wiring. I extended the switching live with earth coloured wire, the other live with brown coloured cable, and the neutral in blue. Ok, yes not standard colours, but I'm not trying to win any compliance awards. So if you look at my photo, you'll see that the live and neutral went into the central connections, and then the switching live went into the live of the heating load circuit (L1).Setting the Wifi connection was pretty easy after downloading the app. I just followed the instructions on the enclosed paper sheet, and it all connected quickly, and without issues.So now as the fitting nightmare fades from my memory, I'm left with a great system. I just leave the main central heating controller left to ON, and I'm using the timer on the app. I can't see how the clock will lose time (as some have complained), as it's connected to the internet (I didn't even have to set the time), but as it stands it's in line with the correct time right now.An added bonus is that it can connect via Google Home and Amazon Echo (Alexa). I've connected via Alexa, and it's great,"Alexa, turn thermostat to 26", and bingo the thermostat almost immediately changes it's temperature.I wanted to leave a fairly detailed review, because I'd have loved to have had a similar review before I bought it.Hope this helps someone.All in all, we've now got a Wifi controlled central heating system, that we can control from the living room.... the bedroom.... or even when we're out and about, and all for £33! It's a really smart looking bit of kit, and has touch controls. Amazing stuff.Thanks for reading! :o)
D**N
Don't waste your money
Complete and utter rubbish - just stopped working only had it a couple of months. Seriously I would avoid at high cost. Go and buy something that's better that actually works. Might as well planned my boiler into a lump of Swiss cheese. I would actually give it -100 stars
L**Y
Sleak and Easy to install
The Thermostat was easy to wire but there is an incorrect instruction for connecting to the internet. I did not need the floor temp probe that came with it1) Installation. I used this as a three wire Connection to replace an existing 3 wire dial thermostat. Live and Neutral for Power. and a switched live for actuating a relay to an oil-fired boiler. No need to add a second Neutral as I had a neutral connected to the relay already. The Thermostat should ideally be installed in a deep 35mm box. Switch boxes are 25mm. All depends or how much plaster depth on the walls if you already have a 25mm switch box.2) Connecting to the Internet. The instructions to connect to the internet tell you to scan the QR code in the Instruction Manual. This is wrong. Scan the QR code on the Box that it came in as this is unique for that unit. If you scan the QR code on the Manual you will not connect. Believe me. I tried for over 20 minutes. When installed all was fine. I turned the power off for 5 minutes. When I switched back on the time was still okay and the Unit connected no problem to the App. Clock time was correct. Started at 00.00 but reset to the correct time quickly. I assume it is getting the time from the internet as there is no mention of an internal clock battery. I would use the App for setting it up as this is much easier that using the controls on the Thermostat itself. Alexa Echo set up was easy enough through third party devices in settings. . Voice commands on temp will only work on Manual control. Not on automatic.All in all happy so far. Just one star off for poor instructions on correcting to the internet
D**W
Initial impressions very good.
I’ve been looking for a simple WiFi controlled thermostat to control individual room ceiling heating for a while. I’d discounted Hive, Nest and Tado as unsuitable (and expensive) and then I stumbled upon this. It had mixed reviews, but it seemed to me that where it worked, it worked well. So I took the plunge. And I’m very pleased I did.Installation of the physical device was simple enough (it’s covered very well in other reviews), but where I did struggle was in the WiFi set up. I couldn’t get the app to find the unit. The instructions say to confirm that you’ve a 2.4ghz circuit and it turned out that was my problem. We have a Sky Q box and by default it synchronises the 2.4 & 5ghz circuits. Once I’d split these and given the 2.4 a unique name, the app found it on its first pass. Setting the Auto schedule up is also very quick on the app, much easier than on the touchscreen itself. I’m currently running in Manual mode though, so yet to test whether the clock runs fast as mentioned in a number of reviews.And as a nice little bonus, it also works with Alexa. Just add the Weback skill in the Alexa app.Only time will tell as to whether it’s reliable, but so far, so good and a second unit is on order for another room.
M**L
ALMOST EXCELLENT
LOST MY MANUAL AND MY QR CODE. WAS DIFFICULT TO CONNECT. WORKS GREAT UNTIL IT LOOSES POWER AND THEN ITS DIFFFICULY TO CONNECT AGAIN. IF ANYONE HAS A PDF MANUAL FOR IT , I'D BE GRATEFUL
M**O
Termostato molto bello e funzionale
Ho il modello wifi per riscaldamento a pavimento.Il termostato esteticamente e' molto bello e moderno, mostra temperatura ambiente e temperatura impostata, ha anche sensore esterno per il pavimento, io pero' l'ho posizionato all'esterno della casa.Bisogna collegare un relè che apra e chiuda un contatto, dal termostato alla caldaia, se non si vuole bruciare la scheda elettronica della caldaia, come ha fatto qualcuno che non e' elettricista.Io l'ho fatto collegare. Nelle impostazioni avanzate, e' possibile anche calibrare il termometro,io ho dovuto abbassarlo di 1,5°C.Si puo' anche settare l'isteresi.Davvero eccezionale.
M**L
macht was er soll, zuverlässig.
FLOUREON Raumthermostat.Läuft seit ca 3 Wochen, und macht was er soll, zuverlässig.Wochentags läuft er bei mir auf Automatisch, Wochenende Manuell.Die Automatic läuft zuverlässig, wie bei einigen geschrieben das sie Probleme mit der Uhr haben, kann ich nicht bestätigen nach 3 Wochen geht die Uhr auf die Minute genau.Display ist klar und deutlich zu lesen, im eco Modus bei Tageslicht so naja kann man aber jederzeit umstellen auf Dauer an.Steuert bei mir eine Vaillant atmoTEC plus Gas Therme230 Volt 3 Kabel werden benötigt, L, N, und das Steuerkabel. Wobei die 230 Volt L einfach nur durchgeschliffen werden.Ersetzt quasi den Standard Raumthermostat VRT30 von vailantMontage und Initialisierung, Kinderleicht.Alternative Hotspot Methode verwenden, also der Raumthermostat macht ein Hotspot und man logt sich mit dem Handy einmal dort ein und den Rest macht die weback app.
M**O
Un excellent produit mais...
Un excellent produit, mais les instructions sont nules. J'en ai acheté trois.La meilleure méthode d'installation consiste à se connecter à la source d'alimentation, puis à installer l'application WeBack et à ajouter le thermostat en sélectionnant Add a device, puis en scannant le code QR dans les instructions. De là, vous pouvez y arriver.
R**O
Calidad a muy buen precio
Todo bien buena calidad y funciona muy bien
C**N
Bonne achat
Joli rendu.. fiable à 0.5 degrés prèsJe conseille
Trustpilot
2 months ago
2 weeks ago