🔩 Connect with Confidence!
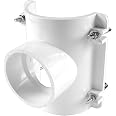
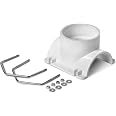
The Oatey43793 PVC Saddle Tee Kit is engineered for seamless tapping into 3-inch or 4-inch Schedule 40 DWV lines. This comprehensive kit includes a saddle tee, V-bolts, washers, and nuts, all crafted from durable PVC to ensure reliable performance under pressure. With a working pressure capacity of up to 10 PSI, this kit is designed for easy installation and long-term use.
| Manufacturer | Oatey |
| Part number | OATEY - 43793 |
| Item Weight | 45.4 g |
| Product Dimensions | 17.78 x 16.51 x 11.43 cm; 45.36 g |
| Item model number | OATEY - 43793 |
| Size | 4-Inch x 3-Inch |
| Color | White |
| Material | Pvc |
| Item Package Quantity | 1 |
| Number Of Pieces | 1 |
| Batteries Included? | No |
| Batteries Required? | No |
F**K
Product was great
Product was perfect worked out like a charm
B**B
For schedule 80 pipe
This works great for tapping a live drain but it is for schedule 80 pipe so if you are using schedule 40 pipe you will need to get an extra piece of schedule 40 at least the length of this unit. Slice it down the length of it, prime and glue both pipes and snap your sliced pipe over the drain pipe. Let the glue set, then prime and glue the unit over that following the directions. Once the glue dries, run your hole saw through it making sure not to lose the piece in the pipe (stop short, secure with screw as a handle and break free) debur the edge and it's ready for service.
N**N
Installation Clarification! May require modifications...
I've installed 3 of these on a buried 3" & 4" pipe that directs water from downspouts, patio drains, and retaining wall stains, out to the curb.Installation is straight forward enough, but the 4" and 3" pipes I was connecting to are all Schedule 30 DWV variety, the slightly smaller diameter / thinner cross section. This saddle is intended for Schedule 40 diameter pipe.Simple enough, I ordered a 3" PVC DWV adapter bushing from Supply House, and that easily allowed the transition from the smaller DWV to the larger 3" Sch 40 socket on this saddle. It also appears a 3" DWV coupler is the proper outer diameter to fit the saddle's socket, but haven't actually installed it that way.For the saddle connection to the slightly undersized 4" PVC, I cut an extra length of Sch 30 DWV pipe -- about the same length as the saddle -- split it open, and "wrapped it" around the existing buried pipe, securing it with PVC cement. This increased the diameter to that of Sch 40 PVC and the saddle fit perfectly. I drilled the opening through both pieces using a hole saw, only after they were glued together.One part of the instructions that's unclear is that, after gluing the saddle onto the main pipe (step 3), we're advised to "not disturb" for 2 hours, nor "apply pressure" for 8 hours. Step 4 instructs to install the included clamping bolts.I called Oatey to clarify whether I should wait 8 hours before "applying pressure" (installing and tightening the clamps) and told I should do that immediately after gluing (within 15 minutes, I was advised).PVC becomes soft when PVC cement is applied, so I wanted to make sure they didn't intend this to prevent tightening the saddle down so much that it deformed the main pipe.Rather than PVC primer, I chose PVC cleaner on this job, since the buried pipe was fairly dirty. I also used a pair of cheap 1" paint brushes for application of the cleaner and cement, to ensure good coverage.
R**E
Great Product for DIYers - Tying 3" PVC to 4" Cast Iron
I used this to tie new 3 inch PVC into the 4 inch cast iron stack below my basement floor. To use this with cast iron you have to purchase the gasket. I used silicone caulk to "glue" the gasket to the saddle tee, and after letting the silicone set up, I cut out the hole carefully with a small knife. I used a 3 inch Diablo hole saw to cut into the vertical cast iron stack - getting the pilot hole through the cast iron took a while and I ended up switching from my cordless 18v drill to my corded drill (probably should have used the corded drill from the start), but once the hole saw started it went through the pipe like butter. I liberally used silicon caulk over the entire pipe side of the saddle tee gasket prior to attaching it to the pipe with the u-bolts and nuts - some silicone oozed out along the inside of the hole, easy enough to wipe off the excess all the way around. Let the silicone set and you are ready to go with the rest of the plumbing. Another reviewer talked about changing the diameter of the saddle to try and get a better fit, if you have 4 inch cast iron and the gasket - you don't need to do anything to it. The gasket will take care of the fit.
J**.
Worked like it should.
Easy to use worded like it should.
Trustpilot
1 day ago
1 week ago