Elevate Your Workout! 🏆
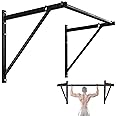
The Yes4All Heavy Duty Wall Mounted Pull Up Bar is designed for serious fitness enthusiasts, boasting a robust 500lbs weight capacity and a durable powder-coated finish. With easy installation options and a spacious 30-inch clearance, this pull-up bar is perfect for a variety of exercises, making it an essential addition to any home gym.


| Brand | Yes4All |
| Color | A. Heavy Duty |
| Maximum Weight Recommendation | 500 Pounds |
| Mounting Type | Wall Mount |
| Material | Alloy Steel |
| Special Feature | Heavy Duty |
| Product Dimensions | 50"W x 31"H |
| Age Range (Description) | Adult |
| Item Weight | 24.25 Pounds |
| Item Package Dimensions L x W x H | 43 x 32 x 2.7 inches |
| Package Weight | 12.5 Kilograms |
| Item Dimensions LxWxH | 50 x 50 x 31 inches |
| Brand Name | Yes4All |
| Warranty Description | 30 DAYS RETURN & 1 YEAR WARRANTY |
| Model Name | 3MX1 |
| Suggested Users | Pull-Up Bars |
| Number of Items | 1 |
| Manufacturer | Yes4all |
| Part Number | 3MX1 |
| Model Year | 2018 |
| Included Components | 1 x Heavy Wall Mount Chin Up Bar |
| Size | 30 lbs |
| Sport Type | Sporting goods |
A**A
Excellent Pull-Up Bar: Robust, stable and beautifully finished
I was very impressed when I received the pull-up bar. It's of very good quality, and the finishes are very polished and beautiful. The entire assembly, meaning the bar and the two side supports, weighs a considerable amount—23 pounds (10.6 kilograms), but I think this is understandable; it's a sturdy structure.The manufacturer claims the pull-up bar can support up to 500 pounds (225 kilograms). My guess is that this refers to the strength of the metal structure and not the tensile strength the anchors installed in the wall can withstand. Let me explain the details:The pull-up bar is held to the wall by eight screws, meaning four screws in each side support. Each screw is quite large. To give you an idea, the plastic anchor that is inserted into the wall has a "12x60" marking. This means the measurements are in millimeters, and its dimensions are 60 millimeters long by 12 millimeters in diameter.Although the screws and anchors that come with the pull-up bar are unbranded, I've taken the average value of similar anchors. The tensile strength each anchor can withstand depends on the wall material. If it's concrete, the approximate tensile strength of each anchor will be 222 lbs (100 kg); if it's solid brick, 111 lbs (50 kg); hollow brick, 44 lbs (20 kg); and drywall, 22 lbs (10 kg).If we add the tensile strength of the eight anchors, perform a simple vector calculation to determine the maximum supported weight, and allow for a 50% safety margin, we can conclude that, depending on the wall where it is installed, the approximate weight the pull-up bar can support is:Concrete: 1,777 lbs (800 kg)Solid Brick: 888 lbs (400 kg)Hollow Brick: 355 lbs (160 kg)Drywall: 177 lbs (80 kg)BUT CAUTION! Remember that the maximum weight cannot exceed the manufacturer's estimate for the structure: 500 lbs (225 kg).FINAL CONCLUSION:1) If you install the pull-up bar on a concrete or solid brick wall, the maximum recommended weight it can support is 500 lbs (225 kg).2) If you install the pull-up bar on a hollow brick wall, the maximum recommended weight it can support is 355 lbs (160 kg).3) Never install the pull-up bar on a drywall wall.I installed the pull-up bar on a hollow brick wall. I weigh 177 lbs (80 kg), and it worked very well. It's stable and stays perfectly fixed to the wall. I hope this long comment helps answer any questions other buyers may have, and that I also had before purchasing the pull-up bar.
A**P
Heavy duty and easy install
Seems like a great pull-up bar...heavy duty and the welds are strong. If you're handy, it's quite an easy install. This 60+ y/o woman (who is not especially handy but also not a total klutz) did it by herself. If I had had help it would have gone faster. I put a 1x3 under the wall bars to cushion the drywall, and used 4" lag bolts instead of the included 3". Even without the 1x3, I probably would have gone for 3.5" lag bolts...the included hardware just didn't look like it was long enough. Plus they included plastic drywall anchors(!) with the bolts. Lol. No way this should go up in drywall only...must go in studs. Anyway, it's extremely solid and seems like it will hold up well. Time will tell. If you want a basic bar for pull ups that will also easily support more complex movements like muscle-ups, or other equipment like TRX straps, rings, or even a punching bag, this is for you. Excellent value for the money. Highly recommend!
M**C
Sturdy, Rock Solid, and Easy to Mount
The bar is rock solid, well built, and I'm very happy with the purchase. I installed this inside our home, on a normal sheetrock wall. I did purchase longer lag bolts from the local HW store, as you need longer bolts to account for the sheetrock depth. I purchased 8 lag bolts of size ( 3\8" diameter x 3 1/2" length) and they worked great.Several folks mention it takes two to mount, however I found this relatively easy to mount myself. Here's my method, in case there is anyone else mounting this yourself. ( you'll need a drill for the pilot holes, a level of some sort, tape measure, pencil, socket or wrench for the lag bolts, and some method to find the studs )#1)Find the two mounting studs, mark two long vertical line (using a level) that should be 48" apart. The width of the support braces will align to 48" for the mounting holes. Double check all the holes to verify they are on the two studs.#2)Find the height you want to mount the bar. For me, I stood tall on my toes, reached ONE arm up as high as I could, marked where my finger could reach to. I then added 1" to this, and made this the center line for the bar. ( This height worked great, as I can barely reach the bar once installed with one hand, and then I can pull the my other hand on to the bar and grip it. Once my feet are flat, and my hands are in a fist around the bar, I'm fully dangling, but only a couple of inches off the floor. ). ** This assumes you have plenty of height above the bar, in case my I did.#3)Now, using a level, draw a horizontal line from the bar height you just marked, that extends fully to the left and right, until it intersects the horizonal support lines. ** This is NOT where you drill the pilot hole.#4)Now, 2" ABOVE the center line of the bar is where the top most mounting hole is for the supports. Measure 2" above the intersection, and mark this location for your pilot hole on both the right and left side. **This IS where you drill the top most hole for the support.#5)Drill one hole, mount one support ( top screw only ). Get it snug, but not tight, so the support can still move semi-freely.#6)Repeat for the second support arm ( top screw only, leave it even more loose than the first.#7)While both supports are still loose mount the bar and tighten it down.#8)Double check everything and adjust slightly up or down if you need to get it perfectly level, then snug the two top bolts.#9)Drill the other 6 pilot holes, and install the remaining 6 lag bolts. Use the level again, to ensure the support braces are perfectly vertical.#10)Retighten everything.It worked well for me, and there was never anything where I needed more than my two hands.
D**N
Very happy with this purchase!
As others have mentioned, the screws that come included are too short for mounting it directly on studs, so I got some 3"1/2 lag screws and was able to mount it with peace of mind.The manufacturing quality is very nice and it has the perfect size to be able to use it with proper technique and not having touching the wall, even at the closest bar position.I decided on this product specifically over the door frame type because I'm pretty tall so I was able to mount it up high and I do dead hangs, pull-ups and leg raises without touching the floor.Very happy with the purchase and would recommend this to anyone. Just make sure you have high enough ceilings and the space for it because it's larger that I imagined.
Trustpilot
2 months ago
3 weeks ago