


LeaningTech Newer Version 12V Relay Cycle Timer Module - Programmable with Customized Settings (Increased to 18 Modes)
Product ID: 10128934
⚡12V Power
🔄18 Modes
🛡️Auto Protection
⚙️ Power Up Your Projects with Precision!
The LeaningTech Newer Version 12V Relay Cycle Timer Module is a state-of-the-art programmable device that offers 18 customizable settings, ensuring versatility for various applications. It features auto protection against faulty wiring, making it a safe choice for both professionals and DIY enthusiasts. The package includes the module and a user manual for easy setup.
D**G
How To Use Learning Tech's Timer Relay + WeMo Maker to Remotely Control / Open Electric Door Strike or Magnetic Gate Lock !
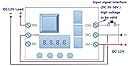
Just when I was ready to return my new WeMo Maker I ordered to remotely control my outside door gate with and electric strike lock (in conjunction with my Ring Video Doorbell unit which WeMo has partnered with) because it is unable to send a " momentary on " signal for more than 300ms, and after hours of trying to see if anyone has documented doing this before (no), after some creative thought and investigation, I am now happy to offer you a relatively simple and inexpensive procedure to make this happen for anyone who wants to control their electricially operated remote doors and gates with this great Timer Relay from Learning Tech....Basically, most existing (old) electric strike operated gates and doors were at one time hooked up to a old intercom system,or opearted with a mechanical push button and small transforner to send a momentary on signal to the electric door / gate lock to open it.In order to make this completely remotely operable via your Computer, IOS, Android, Ring Doorbell or WeMo Apps,we must install a simple, inexpensive, ready to run digital delay timer circuit with variable delay, with the WeMo Makerused to trigger that circuit which sends a variable Momentary On signal to open the door strike or magnetic door lock.The below parts list assumes you have a existing 12V DC door strike or magnetic lock installed and controlled bya push button and/or intercom system, and powered by a 12-16VDC transformer, usually located in the garage (ornew installation) where the door mechanism needs no more than 12V DC, 1A to 10A max to operate (pretty standard,however any voltage in theory can be operated with a few tweaks) and that you will be installing all of the belowin the garage or area where the exisited door transforner is located now..Parts List :1) Wemo Maker $69 https://www.amazon.com/gp/product/B00N32H7U8/ref=oh_aui_detailpage_o03_s05?ie=UTF8&psc=12) LeaningTech Newer Version 12V Relay Cycle Timer Module ($22.00, but there a ton of other options) https://www.amazon.com/gp/product/B00P0TZ5CY/ref=oh_aui_detailpage_o05_s00?ie=UTF8&psc=1LeaningTech Newer Version 12V Relay Cycle Timer Module - Programmable with Customized Settings (Increased to 18 Modes) Manual link : https://www.dropbox.com/s/yu5jk3d41o6rlxe/Timer_Manual_2015_05_04.pdf?dl=03) 110 /120V AC to 12V DC 10A Switching Power Supply / Transformers ($18, but again a ton of options) IMPORTANT - The Relay Timer Module MUST have a clean, regulated power source to operate ! We will use this both to replace the existing door strike transformer and to power the Timer Relay + Wemo Maker https://www.amazon.com/gp/product/B01EH3VUXG/ref=oh_aui_detailpage_o04_s00?ie=UTF8&psc=1 4) Step Down Regulator / Power Supply Module 12V/24V/36V to 5V Transformer with USB + Micro USB ($12 and hooked up to the Switching Power Supply above to power the Wemo Maker + WeMo Maker Relay Circuit https://www.amazon.com/gp/product/B016XI9CZQ/ref=oh_aui_detailpage_o04_s01?ie=UTF8&psc=1. 5) Short pieces of insulated 18 20 or 22 guage wire to hookup and power the Timer Relay and Wemo Maker, and to hookup the leads from the Wemo Maker Relay Output to the Tmer Relay 6) Optional : If you do not get a good WiFi signal in your garage or area where this is being setup (or if you are haing issues connecting your remote Ring Video Doorbell as well), install a cheap but very good WiFi signal extender like this one I purchased for $30 : TP-Link AC750 Dual Band Wi-Fi Range Extender / RE200 https://www.amazon.com/gp/product/B00NR2VMNC/ref=oh_aui_detailpage_o07_s00?ie=UTF8&psc=1So, until I get some pictures of the actual installation (I have hooked up and tested this, and now working for proofof concept for the past few days, but waiting on a couple of the parts above to install it to my garage wall) you will :A) Use wire to connect both 12 VDC + and 12VDC - power from the Switching Power Supply (or battery power will work for testing/programming only) to the Timer Relay (DC+) and (DC-) Input Blocks, and then using the manual link, select " Function 12 ", and program the number of seconds the " Momentary On " function should last (Note: Do not run door strike for more than 30 seconds at a time, or you run the high risk of prematurely wearing out the Strike ! (I have mine programed for 10 seconds for now) See Manual For More InformationB) Plug in the Wemo Maker using the supplied USB cable or 120V Wall Plug (we will be using the 12VDC to 5VDC Step Down Transformer hooked up to Switching Power Supply to power this when installed, but you can of course use any existing wall outlet if you have one at the final installation site) and connect the Maker to your WiFi system using the WeMo App, select "Momemtary On", and test unit for proper operation of relay first.C) Hookup a wire from a 12VDC + output of the Switching Power Supply to the Wemo Maker Relay Input Block and add another wire from the Wemo Maker Relay Output Block to the Timer Relay (CH+) Input BlockD) Hookup a wire to the 12VDC + Power output of the Switching Power Supply, then twist this wire with one wire from the Door Strike and hookup to the Timer Relay (COM) Output BlockE) Hookup a wire to the 12VDC - Power output of the Switching Power Supply then twist the other wire of the Door Strike and hookup to the Timer Relay (NO) Output BlockBOOM ! Your done.... It's that simple ! Of course, now add the Wemo Maker App to all your device(s),and if you are using the Ring Door App to control opening your door via the Ring app, just add theWemo control link by choosing the Ring+ Parnters button located in your Ring App..Let me know how this worked for you as well...
C**1
send directions with your product
I'm really pissed at these guys I work on helicopters for a living so I should be able to figure this out but it should come with instructions to give you the out the end which ones Nutro which one is positive which one starts o'clock but it will delay until your car started and everything is warm. And then this comes online putting all your other accessories on before you start the car but for goodness sake send directions you idiots
3**O
Very flexible timer.
This was used to control the duty cycle of a home central heat and air heatpump recirculation fan. It is wired in series with the recirculation fan control line using the normally closed contacts. The power to this is disconnected when the heatpump is in any mode other than "Fan Only". In other words, you do not want this to stop the recirculation fan when in Auto, AC or Heat modes as set on the wall thermostat. However, a heat pump stops working efficiently at a certain temperature and then electrical heat strips kick in consuming gobs of electricity and soaring your electric bill. I actually have the circuit breakers for the heat strips turned off. We have propane wall mount heaters, blue flame from empire, that we use to heat with when temperature gets around 40F or lower. But those wall heaters even with integrated fans naturally heat the room they are in very well but that heat doesn't distribute well to other parts of the house. So I would set the home thermostat on "fan only" to distribute the heat from the propane heaters throughout the home. But doing so runs the recirculation fan all the time, i.e. 100% duty cycle. This timer reduces that duty cycle. I have it set for 5 minutes NC and 15 minutes OC giving a 33% duty cycle. That seems to work well until the outside temperature gets into the teens. Figuring out this duty cycle is dependent on many factors specific to each home and takes some trial and error.The best solution would have been an integrated heatpump with propane heat pack. But we don't have that nor is one available for our heatpump. The propane wall heaters cannot be mounted close to the recirculation return. Placing the propane wall heater on the wall directly across from the recirc return is a bad idea. The draft caused by the recirc return can disturb the proper and efficient combustion of the propane. So they must be mounted at least twelve feet away according to the manufacturer. In our case, the nearest propane wall heater is 20feet away and around a wall corner from the recirculation return.So when it gets around 40F outside, I turn on the propane wall heaters, set the home thermostat control to "fan-only" and turn on this timer. When outside temperature gets above 40F I turn off the timer, set the home thermostat control to "Auto" and turn off the propane wall heaters. It's a simple process and it works well for us. Thanks to this simple timer, I can reduce the duty cycle of the recirculation fan when we are using the propane wall heaters thereby distributing the heat produced by those heaters, reducing the wear on the recirculation fan (which are ridiculously expensive BTW) and saving on our total energy bill.There are 24V versions of this timer but I decided not to power this off the 24V supply line at the wall thermostat. I did not want to put any additional load on the existing system. I use an external 12V DC wall wart. I mounted this in a clear Hammond plastic enclosure and secured to the closet wall behind the home thermostat. You can add a switch in the 12V power supply line to turn this off or unplug the power supply. It must never be turned on when the home thermostat is in any mode other than "Fan-Only" as damage could result to the heatpump. Therefore do not do this if you cannot follow the same process in the same order every time. Also ensure that during a power outage that your home thermostat remembers it's last setting. This can be tested by cycling the breaker to the heatpump.
Trustpilot
1 month ago
3 weeks ago