🎬 Elevate Your Viewing Experience Anywhere!
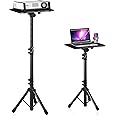
The Towond 150-inch Projector Screen is a portable, high-quality projection solution designed for both indoor and outdoor use. With a 160° wide viewing angle and 4K HD capabilities, it ensures sharp and bright images. The screen is easy to set up in just 2 minutes and is lightweight at 11.5 pounds, making it perfect for family trips, camping, or backyard movie nights. Its wrinkle-free design enhances your viewing pleasure, while its versatility allows for various applications, from movie nights to business presentations.


| Operation Mode | Manual |
| Viewing Angle | 160 Degrees |
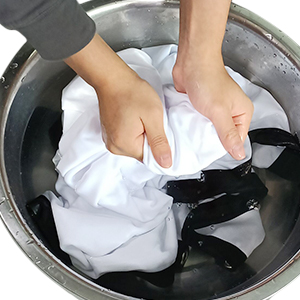
| Screen Finish | 160°wide Viewing Angle,Anti-crease,Wrinkle-free |
| Mount Type | Tripod Mount |
| Screen Dimensions | 150 inch |
| Item Dimensions W x H | 130"W x 102"H |
| Material | Polyester |
K**R
Well made - excellent image quality - very portable and easy to set up and take down
I will be giving a presentation in a large dining hall in a couple of weeks. The hall has no screens for projections, and I need to be able to project large enough for people to see from about 80 feet back. Further, the entire East wall is glass with no drapes or other covering, so there will be a lot of ambient light - especially right after lunch at noon.I have a fairly bright projector, but I needed a portable projection screen that gave me at least 9 feet of horizontal display area.I selected the Towond 150" screen after reviewing it and others and checking the comments.This was a good choice.The Towond screen arrived packed in it's carrying case. The black plastic fabric case is 32" long x 6" x 7" with a carrying handle, and is quite light - their data sheet says 11.5 pounds, but it feels lighter.The case contained all the parts, a minimal pictorial instruction sheet (which was sufficient).The screen itself is in a separate, heavy-weight, zip-lock-type bag to protect the soft white polyester screen.Set up was easy by following the directions. The top-bar pieces are individually numbered and shown clearly in the instructions. The two vertical legs need no assembly - just loosen the friction locks and extend the vertical posts. I was able to set up and take down single-handed with no effort.Suggestions for the easy way (IMHO):1. Set up the vertical legs approximately where you want the screen to be located. Loosen the clamp holding the three bracing legs against the center post and extend the bracing legs until the connecting parts between the bracing legs and the center post are horizontal. (Note - the safe way to open this is to pull each of the three bracing legs outwards.) Tighten the clamp so the bracing legs are firmly set.2. Extend just the upper-most vertical leg pieces on both legs. (Leave the lower two extensions down.)3. Assemble the cross-bar - follow the directions and ensure you have the bars in the correct order AND the two end pieces should have the larger through-holes at the extreme ends.4. Remove the wing nuts and washers from the legs and set them aside.5. Slide the screen onto the cross bar - take your time and avoid catching the fabric on the feeding end of the cross bar - don't get impatient and tear the material. (The material seems strong enough, but just take it easy...)6. (one person can do this easily, but two make it real easy) Place one end of the cross bar on the post on one leg, then repeat with the other end - moving the leg as needed to match the bar length. Make sure both legs are stable and not tilted.7. Fasten the bar to the legs with the washers and wing nuts.8. At each end, fasten the top two velcro straps around the top-most leg sections (if you don't do this now, you may need a small step-ladder later).9. At one end, loosen the next section and extend it (I was cautious and did this in two steps to avoid stretching the screen material. There is a marker line when it is fully extended. Tighten the clamps on both ends fully.10. At each end, fasten the next velcro straps around the middle leg sections.11. At one end, loosen the last section and extend it. There is a marker line when it is fully extended. Tighten the clamps on both ends fully.12. Fasten the remaining velcro straps around the lower leg sections.13. As needed, adjust the legs (and/or velcro straps) to remove any sag or ripples.(Note - I am only using this indoors, so I didn't use the ground anchors or the tie-downs.)Disassembly is similar, but even easier:1. Unfasten all the velcro straps on both ends (all the ones you can easily reach - you can leave the top ones for later).2. Slowly and easily, loosen the bottom leg section clamps and lower the legs, then tighten the clamps. Again - I did this in two steps to avoid excessive stretching.3. Repeat with the middle leg section clamps.4. Unfasten any remaining velcro straps.5. I found it easiest to remove the cross bar and screen at this point, with the lower leg section still extended.6. Remove the wing nuts and washers from the two legs and put them aside.7. Remove the cross bar and screen from the legs.Note - ideally have a very clean floor/rug, or if you have friends helping, try to keep the screen clean while disassembling.8. Slide the screen off the cross bar. Fold it down into a small enough area to fit in the screen zip-lock bag.9. Disassemble the 5 cross bar parts and put them back in the longest bubble-wrap bag. (Note - rubber bands around the ends will make getting them in the bag much easier.)10. Fasten the washers and wing nuts on the legs.11. Loose the last vertical sections of the legs and collapse them fully, then tighten the clamps.12. Loosen the clamp holding the three bracing legs on each support leg and collapse them, then tighten the clamp.13. The two legs now fit in the two smaller bubble-wrap bags.14. The three bubble-wrapped pieces (legs and cross bar) and the screen bag all now fit in the carry bag.So - I set it up in our dining room where the east-facing wall is all glass - clear and very sunny day here at 1PM. I set up the projector with the sunny display behind it and the screen facing the bright daylight.The projected display on the screen was sharp, clear, and plenty bright.Very satisfied - easy to assemble and disassemble - excellent image quality. The materials all seem to be good quality. The metal parts all seem solid and well made. The screen folds and unfolds and doesn't appear to take any creases.Overall - great product - exactly as described and works great.
D**L
Love the size wouldn’t want a smaller one
Very happy with mine seems to be holding up well. Priced right
J**
It’s a keeper
The media could not be loaded. The reason I’m giving it 4 stars and not 5 is because it’s not anti-crease as it claims. Even when it’s stretched all the way out it was still wrinkled. But if you have a steamer it gets those wrinkles right out and no it didn’t damage the cloth. It was real simple to put together. We purchased the 100 inch screen and it came with all the items listed, which also included the bag. The picture quality on it is very good. We have it set up in our theater room in our house. All in all I recommend it.
I**R
Youre own IMAX experience at home!
Perfect for my living room. I have the same brand of stand but in a 120" size.Set up is fairly easy. However, I recommend using a chair or a small ladder to mount the top bar. I didn't use the included screen as I bought one that has a black backing.I went from a 120" screen to a 150". The size difference is massive!! Now we feel we have our own IMAX theater at home!I like the fact the side stands are a tripod type. The top bars are metal as well. Which makes it feel sturdier.I recommend the stand for sure!
T**A
Perfect
Great screen easy setup. I recommend this
W**.
Can get you by however not stable
So many pros however for poles were a big con this we returned it. I loved it came with an easy set up with lines letting you know how tall to make it however once it’s fully extended there is not support even with the lines tied to prevent it blowing over. I love the compact bag just again the poles were easily not able to handle the extension. I would love to be in the loop for an upgrade on the poles if they were make one!
A**R
Worth the money
Shipped on time and well packaged. High quality materials
C**P
Avoid
Worked well for two uses but on the third use one tripod failed. At the top of each tripod is a threaded post protruding from a riveted cap. The threaded post snapped clean off the cap and now the entire tripod is basically useless. Nice idea but not well designed or well made.
Trustpilot
1 week ago
3 weeks ago