Desert Online General Trading LLC
Dubai, United Arab Emirates
Desert Online General Trading LLC
Dubai, United Arab Emirates


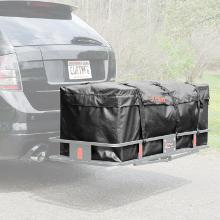
🚗 Elevate your road trips with cargo confidence!
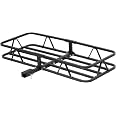
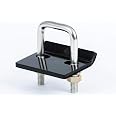
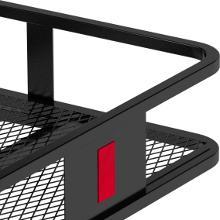
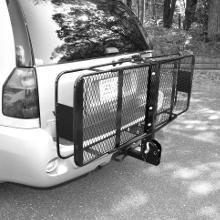
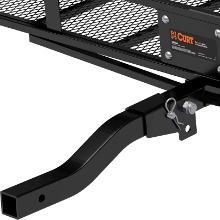
The CURT 18145 Basket Hitch Cargo Carrier is a robust, 48 x 20-inch steel basket designed to expand your vehicle’s cargo capacity by supporting up to 500 lbs. Featuring a universal 1-1/4" to 2" hitch adapter, 6-inch high walls for secure transport, and a durable carbide black powder coat finish, it combines strength, versatility, and safety with integrated reflectors and easy-to-clean tubular base construction.


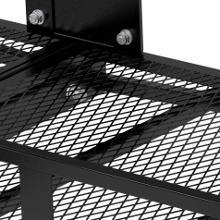

| Color | CARBIDE BLACK POWDER COAT |
| Brand | CURT |
| Item dimensions L x W x H | 25 x 21 x 4 inches |
| Is Foldable | No |
| Load Capacity | 500 Pounds |
| Mounting Type | Power Click |
| OEM Part Number | 18145 |
| Global Trade Identification Number | 00612314002863 |
| Automotive Fit Type | Universal Fit |
| Manufacturer | Curt Manufacturing |
| UPC | 612314002863 797619809154 |
| Model | Basket Cargo Carrier |
| Item Weight | 27.5 pounds |
| Product Dimensions | 25 x 21 x 4 inches |
| Item model number | 18145 |
| Is Discontinued By Manufacturer | No |
| Exterior | CARBIDE BLACK POWDER COAT |
| Manufacturer Part Number | 18145 |
J**E
Make sure you have the bottom part right-side up when assembling
Regarding assembly, it was much much easier once I figured out that the bottom basket part has a right-side and wrong-side up, and that I had managed to put both halves on wrong-side up. Before, I agreed with many other reviewers that the holes didn't align at all, but once I fixed the issue, everything slid together easily.There's a line in the instructions, "Tube must be flush with top of plate for correct assembly," and it's true. When right-side up, the bars of the bottom basket should be closer to the top of the basket part than to the bottom. Make sure you figure out which side should go up.Once assembled, it is nice and sturdy and attaches well to the hitch. It's the best product I could find for small cars with small hitches.I have not yet tested it on the road with hot exhaust coming out, but I intend to put heat-sensitive items away from the exhaust and balance everything out as needed.
C**S
Works good
Good size for smaller compact SUV's. Installation takes some time due to all of the nuts and bolts. Work good.
C**M
Nice rack but only after some difficulty putting it together.
Sturdy rack once put together. Some of the holes don’t align well right out of the box making it difficult to insert the bolts, but can be “ persuaded” to do so with a big pair of pliers wrench to move parts relative to each other, particularly with the end brackets separating the top and bottom frames. No need to grind parts or redrill holes. As mentioned by others, don’t tighten any of the bolts until you get all of them in place.
J**.
DEFECTIVE / DIASTER / DANGEROUS
*Update to the below review --I called Curt, spoke with product specialist Mike --here's the deal --If you follow the provided assembly instructions you'll go awry.You have to build this thing from the bottom up.First you have to attach the 1 1/4" shank to the bottom two shelves.****Incredibly important, there's a near-indiscernable lip at the edge of one side of this bottom-most piece.That lip has to face DOWNWARD, or else it will throw everything else off by a fraction of an inch.This small discrepancy will be just enough to misalign all the holes, which is why ~10% of customersare reporting misaligned holes.Make sure the top of the bottom shelf is completely flush with the top of the 1 1/4" shank.Loosely insert the 4 largest bolt/washer/nut combos to attach shank to bottom shelf.Next attach the two T-shaped brackets that go on either end (front/back), making sure the shankis turned with two holes to the side that would face the trailer hitch (look at pic on box to get idea of this)and also that two holes are on the SIDE of the shank and (not the top).Once you correctly attach the bottom shelf to the shank, the two T-shaped pieces on either end,then you need to loosely attach the 6 V-shaped brackets to the bottom shelf. Once this is done ...Just 'sit' one of the two top rail bars on top of the v-pieces, sliding it into the female opening on the T-shapedpiece. Making sure all holes align, attach this top rail bar to both the T-shaped pice and the bottom shelf.Do the same for the other side.Next you can attach these two top rail bars to the V-shaped brackets (again loosely) using the smallest set of bolt/washer/nuts.From here the thing is fully (loosely) assembled and you just go around the entire carrier making sure to fully tighten all the nuts and bolts.Mike at Kurt needs to be the guy to RE-write these instructions. The instructions advise assembling in the WRONG ORDER and do not give the crucial starting advice to make sure the bottom shelf has the tiny lip DOWN and not up.Follow the above order and details and your assembly will work.Cheers & Best -PS: Curt, have Mike re-write your instructions for god's sakes!!Dear potential Curt Customer, let me save you from a nightmare experience here --First, take a moment to read through the litany of 1 and 2 star reviews stating this product is defective, warped steel, with misaligned holes.Second, notice that this complaint has been consistently voiced by frustrated customers since 2018 (I'm writing this review in June of 2021).Curt Company is simply not bothering to take the time to fix this problem at the plea of injured customers who have spent 3+ hours working to assemble an unassemblable product (fyi, while you may be able to muscle some of the smaller parts into place, it's the FINAL piece, a large-diameter steel shank, which absolutely WILL NOT FIT) --I say "injured" here, because when you're trying to align misaligned holes on heavy gauge, warped steel (per the horribly written, inadequate, innaccurate, instructions) you run a serious risk of bodily injury -- as I was trying to align the holes on the final piece, the steel shank recoiled and hit my shin bone and now I have a huge, blue pump-knot on my shin bone.To add insult to literal injury, like so many others crying out berfore me, I have thrown away 3 hours of my life dealing with this nightmare.Trying to assemble a puzzle that "almost" fits is positively maddening. Don't believe me? Buy this product and then we'll talk. I'm pretty sure the sadistic villain from those "Saw" movies is behind this evil charade.If you're reading this review, please don't make the same mistake I did and discount all those screaming NIGHTMARE in light of the large percentage of positive reviews.Instead, just go find a product that doesn't boast customers screaming NOOOOOO, and isn't going to wreck a half day of your life leaving you having to disassemble, package, return ship, and seek medical attention.Okay, you've been warned. Happy carrier rack shopping.
T**W
Straightforward and solid
Relatively straightforward to put together, although had to undo and redo parts along the way as the instructions weren't super clear on certain directional bits. Installed great in my 2" hitch on a Ford Bronco, the height just under the spare tire (stock 18" wheels, about 32" diameter). I thought I'd have to drop it down a couple of inches, but no.Obviously, depending on your vehicle you may have to remove the contents before being able to open the trunk.
S**H
Good value in a hitch-mount cargo carrier.
Some of the reviews I read spoke of misaligned holes and difficult assembly. I found the holes to be perfectly aligned and assembly was much less complicated than a lot of things I have purchased. The instructions are clear. The only tricky part is making sure that the two platforms are oriented so that the tops of them are flush with the hitch shank. If they aren't, then they are likely upside-down.The basket style carrier is perfect for the small hitch receiver on my R-Pod 179's rear. I moved the spare tire that was located there so that I could use this Curt carrier to hold a spare propane tank, a gas container for my generator, and another container where I keep my BBQ grill, home-built awning and slide-out covers, and my RV electrical cord. The size is perfect since it is narrow enough so that it does not block the taillights or license place holder. Yet, it is wide enough to be useful. The only thing that might cause problems is the base is just bars and not a solid or perforated, but nearly solid base. I ended up taking a piece of thin plywood, cutting it to fit about half (where the smaller items are) and sealing it with polyurethane. It served well on our most recent trip.I have not had to use it, but this carrier does come with an adapter that can be used with a 2" receiver. If it is set up with it, the weight it can carry is increased. However, I have not had a chance to test that. The bottom line is that I would recommend considering this basket style cargo carrier if you have the need for one.
A**N
Impossible to put together
This rack was impossible to put together. some of the holes didn't line up, but there was no way, once it was half assembled, that I was going to take it apart and send it back because it was heavy and bulky. So I kind of jury rigged it together and it held together but I'm not sure it would if it were fully loaded. Two bolts wouldn't go in at all. I stopped and checked on it every 100 miles or so. And I took wire, bungie cords and gorilla tape just in case.
Trustpilot
2 months ago
2 days ago