


💖 Elevate your nail game with KISSSalon—because you deserve the best!
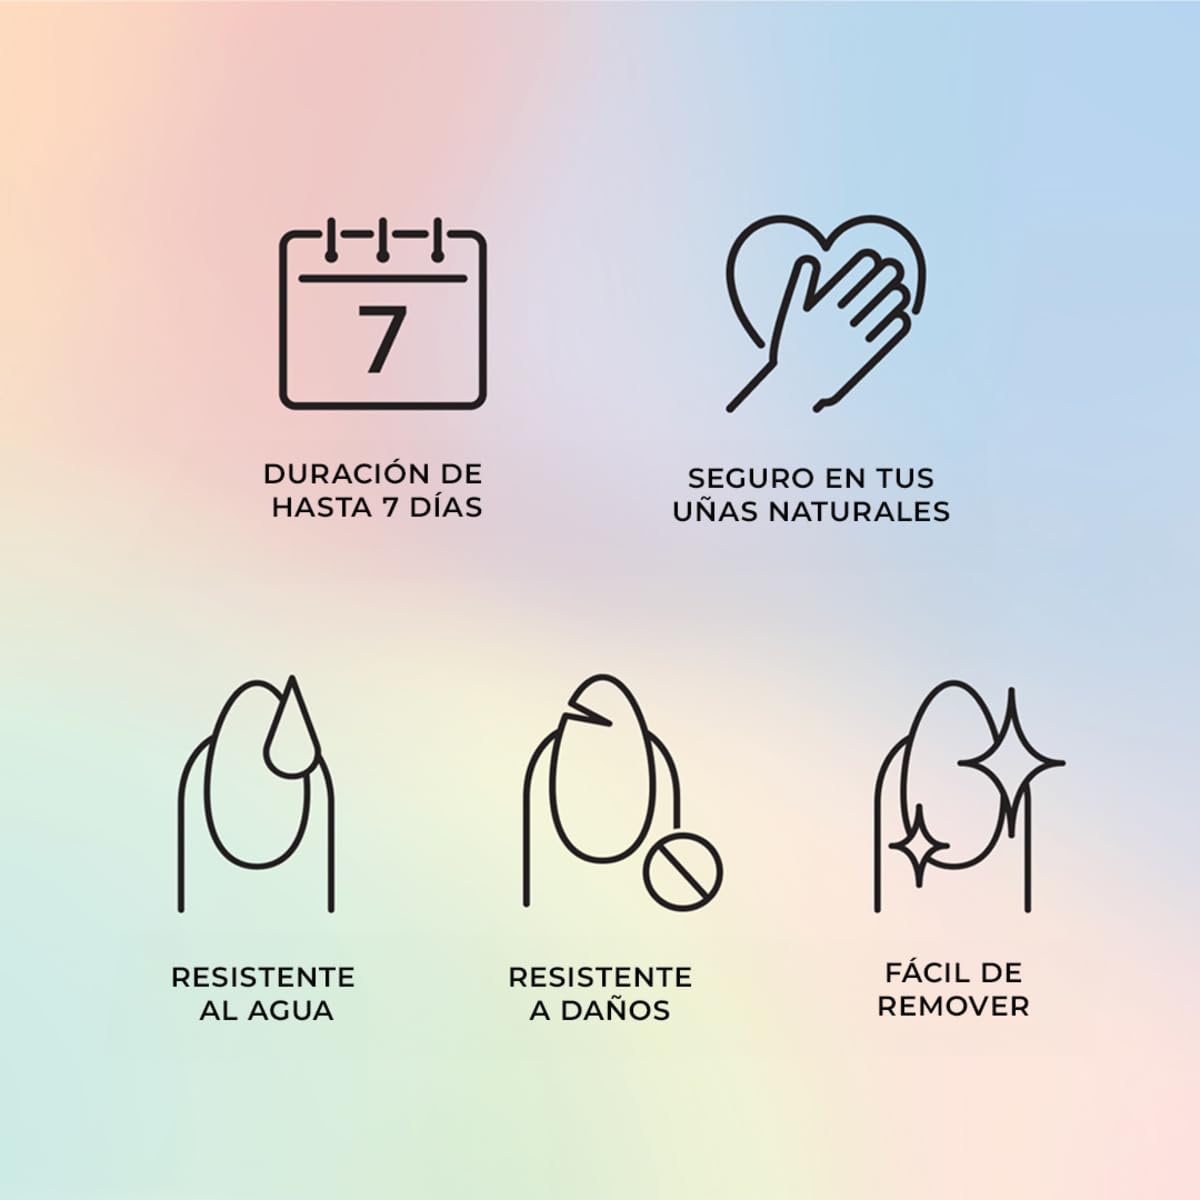
The KISSSalon Acrylic French Manicure Set, ‘Leilani’, offers a complete DIY solution for achieving a professional-looking nude French manicure at home. This 31-piece set includes 28 fake nails in 14 sizes, pink gel nail glue, a mini nail file, and a manicure stick. With Flexi Fit technology for comfort and acrylic-infused strength, these nails promise a seamless, bubble-free finish that lasts up to 7 days.


| ASIN | B08D8Z98CD |
| Best Sellers Rank | #4,804 in Beauty & Personal Care ( See Top 100 in Beauty & Personal Care ) #42 in Press On False Nails |
| Brand | KISS |
| Brand Name | KISS |
| Color | Leilani |
| Coverage | Full Well Tips |
| Customer Reviews | 4.4 out of 5 stars 26,039 Reviews |
| Finish Types | Glossy |
| Global Trade Identification Number | 00731509799453 |
| Included Components | 28 fake nails, pink gel nail glue, mini nail file, manicure stick |
| Item Form | False Nails" or "Press-On Nails |
| Item Height | 13.97 centimeters |
| Item Shape | Square |
| Item Type Name | fake nails with nail glue |
| Item Weight | 0.04 Pounds |
| Manufacturer | KISS Products, Inc. |
| Material | Acrylic |
| Material Type | Acrylic |
| Number of Items | 1 |
| Number of Pieces | 28 |
| Pattern | Solid |
| Product Style | Leilani |
| Size | Medium (28 Count, Pack of 1) |
| Style | Leilani |
| UPC | 731509799453 |
| Unit Count | 1 Count |
R**N
Everybody: "Your nails look amazing!" Me: "Duh, girl. Bye."
If all you need is the short version of this review, here ya go: This is, by far, the best looking set of press-ons I have ever worn. PERIOD. If you'd like to read some tips and hacks I've included for the longevity and care of your press-on nail sets, or if you're reading this during work hours and want to burn thru some time on the clock, feel free to dive into the much longer version of this review below. You're welcome! So without further ado, let's get to it: CUSTOMIZATIONS: 1. To up the longevity: I adhered these with solid nail gel. The nail bed of these Kiss press-ons is transparent enough for LED/UV to penetrate and fully cure the solid nail gel underneath. I spot cure to initially hold them in place, then I will cure for a full 90 seconds for LED (twice that for UV). I cure my thumbs separately. Until somebody invents a curing lamp that has two little internal "thumb boxes" on the far right and left that are lined with LED's going down the right and left sides, I will always cure my thumbs first. If someone ever invented a curing lamp like that ^, I'd be willing to pay stupid money for it. Just sayin'. Sorry! I digress...okay back to these customizations: 2. Next, I add a layer of base coat for the tacky layer followed by a coat of builder gel for strength and/or to build apexes. These press-ons do not have pre-built apexes. The great thing about press-ons is that you can make them your own by adding gel colors, chrome powders, nail art, charms, etc. When adding additional product to press ons, I start with a base coat for it's inhibition layer, but I DO NOT BUFF THE SURFACE first! After a week or so of wear, this allows the base coat, builder gel, and topcoat to eventually peel off as a whole piece taking the gel color, stickers, charms, etc. with it. That layer of base coat+builder gel+top coat will serve to protect the press-ons underneath and keep them pristine. The set will end up staying in such good condition that it can be re-applied multiple times. 3. Lastly, I add a top coat for that shiny, finished look that only a good top coat can give (I highly recommend KUPA Gelfinity Top Coat to make your nails look super juicy! That stuff is my all time fav - she has that thick consistency that makes you go, "ooooooo...yasss, honeee"). The French on this set of Kiss press-ons look to be printed as opposed to painted, so even if you prefer not to add a top coat, the white on this French shouldn't chip. However, I always recommend adding a top coat to any and all sets, if anything, to protect the press-ons underneath. I also add a layer of top coat on the underneath side of the nail tips only. This step really helps to keep them clean. >>>Note about other adhesives for press-on nails:<<< 1. Kiss Nail Glue: If you end up going the solid gel route, DON'T THROW AWAY the tube of Kiss nail glue that comes with this set! Save it to use for adhering opaque press-on sets that LED/UV can't penetrate. Don't underestimate this stuff. Kiss glue is one of the best adhesives on the market for press-ons. While it's worth saving, it does have a shelf life. Try using it within 6 months-ish because eventually, it will dry up and solidify in the tube. 2. Adhesive Glue Tabs (not included in this set): I only use these when I want short-term wear as they have the least amount of staying power. HACK: You CAN increase the wear time of adhesive glue tabs by heating them during application! Always prep your nails first then place the glue tabs in the center of your nail beds. Before removing the protective top film, CAREFULLY heat each nail with a hair dryer. (NOTE: At the risk of soundin like your momma, be careful not to burn yourself during this step! The glue just needs to be warmed enough to become more pliable/gooey. Your hair dryer does not need to look like some orange glowing rocket engine for this to work!) Next, peel off the top film and apply the nail at a 45 degree angle pushing the glue down towards the cuticle. Add pressure and hold for 30 secs as the glue starts to harden (glue tabs don't need LED/UV to cure). The added pressure will cause the heated glue to spread out and cover the entire nail bed lessening the chance for lifting. No lifting = longer wear. Okay. I'm done, except for this last word of warning: Try to avoid injury from all those stabs of jealous side eye when you stroll up sportin this fabsolutely snatched set of kitten mittens. Now get out there and slay.
M**Y
I will never use another brand!!!
I am KISS's biggest fan. I have been using their press ons for many years and am always impressed with the quality and durability. The acrylic french set are a bit thicker than their normal design press ons in my opinion, but they look great on and just like what you get done for $60+ at a salon! They come with many sizes so you can find the right fit for your nails. I have used this set as is and have also painted over it with regular nail polish before (the photo of the red nails are actually this set painted with regular polish!). I follow the application instructions and these nails consistently last 10-14 days for me: 1. Nail prep: you don't need to do anything over the top here, but pushing back your cuticles (and trimming them if you want) will help give you a clean surface for application. I don't usually scuff the surface of my nails at all, but that is recommended to help the nails adhere (just a little scruff goes a long way!) 2. Choose your nails: Finding the right fit for your nail is SO IMPORTANT to the durability! A nail that is too small or too big will pop off earlier. Sometimes that means I need to file down the edges of a nail that is slightly too large (two of my fingers are very close to the same size but the sets only come with 1 of each size) but it is always worth the extra few seconds to get a good fit. I always go through and layout all 10 nails in order that I will use to make sure I have the best fit possible, and if I need to adjust anything I can do that before I begin to apply. 3. Prep your nails part 2: AFTER you have done all the trying on for size and other prep (incl. scuffing if you choose to do that), I use an alcohol wipe to clean off the surface of my nails to make sure they're as oil-free as possible. I then wait a few seconds for that to dry and take care to not touch the surface of my nail again. These alcohol wipes are usually included with the imPress nails (Kiss sister brand with glue sticker tabs instead of glue) but aren't included with the glue-only sets for some reason (but you can get a bulk pack for <$10 on amazon) or DIY it with rubbing alcohol and a cotton ball at home). 4. Apply: I usually start from my pinky and work in. I usually leave my index and thumb for last. I am right handed so I do left pinky, left ring, left middle, right pinky, right ring, right middle, right index, right thumb, left index, left thumb. I don't think it really matters, but that gives me the best control. I use the glue provided and apply a dot to the center of my natural nail. Then I press down the press on at a slight angle to make sure the glue spreads out under the nail completely (but try not to use so much glue that it spills over the side!). Then PRESS AND HOLD while the glue dries - I usually aim for at least 10-15 seconds per nail, but I think 30-60 seconds is recommended. 15 seconds can feel like a long time when applying but this is SO IMPORTANT!! 5. Clean up anything you want: there is usually a small tab in the middle of the nail from production - it's not really noticeable but I usually file it down a bit just to completely smooth it out for the salon-quality. This is more prevalent on almond shaped nails, less on oval and square. When I file, I do try to hold the nail down as I file just to help the glue hold on. I have also used many KISS nails that are longer than I prefer, so after I apply I clip them with normal nail clippers and then file down (the edges can be sharper if you clip them!). I would recommend getting a salon-quality file if you choose to do this. You CAN file the nails into a new shape with the file provided, but it is MUCH easier with a bigger and stronger file.
A**E
Not too shabby
I’ve been doing my nails myself usually using builder gel or full cover tips but have also used acrylic and polygel before. I haven’t had the time or energy to do a full set myself lately so after watching LongHairPrettyNail’s Kiss review on these, I decided to pick up some. They’re much more sturdier than regular press ons and don’t have much (if any) give to them in the extension parts. The nail bed portion is flexible. The length is a nice medium, I’m usually a long/xlong girl but these are work appropriate and easy to handle. Sizing: I had a little issue with sizing since my nail beds are wider than my cuticles meaning that since the nail is tapered in early on, my natural nail would be exposed unless I cut them to nail biting length. I used a 2 for my thumbs, 6 for pointers, 5 for middles, 4 for rings, and 12 for pinkies. I had to file every single cuticle to fit my nail since my cuticles are rounded and the nails had a square shaped cuticle. I did the least filing on my pinkies and thumbs but had to heavily file the ring finger cuticles and sidewalls to make that 4 look decent. Application: I am keen on long lasting nails and usually have trouble with cuticle lifting when my full cover tips grow out and stop molding to my nail shape. Here’s how I prepped to really make them stay. I buffed my natural nails. Wiped with isopropyl alcohol. Applied a dehydrator, max pro bond, and primer. Put on a thin layer of gel base coat, cured, then wiped with isopropyl alcohol. I buffed the base coat lightly then applied dehydrator to it. After filing and prepping the nail, I flicked off any dust. I applied dehydrator to the inside of the nail bed. I applied the nail glue to my natural nail covering everything accept the cuticle and not putting heavy amounts on the side wall to avoid leakage. I applied nail glue to the false nail’s cuticle area. I applied by sliding down the false nail from the middle of my own nail which makes sure that the glue does not flood the cuticle and fully coats the entire nail. It also allows you to find the perfect resting spot for the false nail. I then held down the middle and cuticle for a few seconds then pinched in the sidewalls to avoid gapping and bubbles. After this, I let them rest for a few seconds then filed and shaped them better to my nails and finally wiped them Well with the isopropyl alcohol. I’m not a pro at glue on nails anymore but I know sometimes they didn’t feel the most secure with just the glue. The base gel allows you to fill any gaps from the nail not fully fitting your nail bed that you’d otherwise do with nail glue. Right now they feel like they’re apart of me and I can slam my hand into my counter and they won’t budge. Additionally, the base gel protects your natural nail from the nail glue! Cons: I couldn’t really glue and go with these, they needed a lot of cuticle alterations since my nail beds are rounded. Otherwise, the price can’t be and they honestly look like I got them done at a salon. I absolutely recommend as long as you’re ready to put in a little work to make them look their best Additionally, these are also nice because you could buff the shine off the surface and change the color of the nails with your own polish if you’re not into the French style (which I plan to do when I get tired of the look) or even just add one or two accent nails or apply rhinestones or stickers.
S**G
Longer than expected
These are easy to put on and they look very natural but I would not consider them short. Now I am unsure of buying their brand again considering the length.
S**A
My favorite nails!!
These are my favorite nails. I have long nail beds and most short styles show my real nail. These are long enough and wide enough to cover my nail and look so pretty! Very natural. Very sturdy. They stay looking nice for a full two weeks.
M**T
Absolute perfection EXCEPT the sizing.
I love these nails overall. But, am I the only freak of nature who has TWO THUMBS??? There is only ever ONE of the size 0 and the 1's are too narrow!! And yes, I have ordered multiple sets to make sure it wasn"t a fluke. Always only one size 0. Honestly, they are perfect in every way if I did not have to improvise or buy two sets just for my thumbs. Unfortunately, I cant just cut iff a thumb or make the 1's work. So, it has ti be a no for me. :( I cannot wear actual acrylics or nail polish because of an allergy. Aside from the size problem, these are the best nails i have used. These have a nice, soft and more natural look. They're thinner at the cuticle and thick/sturdy at the tip which makes them lay naturally on my nail bed while not splitting like nails that are uniformly thin. Usually i shy away from the glue that comes with nails, but have found that the glue with these actually works well.
M**Y
Strong and pretty!
A Little more French tip than I expected but I really like em! Look very natural. They were also a little long for My taste so I filed em down a bit- hence the unevenness from my lack of skills 🫠 they were super easy to apply. Will buy again!
K**E
NOT THE SAME
Been wearing these for over a year and they always stayed on until I removed them. The last 2 orders the nails just pop right off. This is last chance for them, if these pop off switching to somewhere else to purchase. Other than that really nice nails, in fact someone recently commented on how must have just got nails done look so nice.
Trustpilot
2 months ago
1 month ago


