
DOWNLOAD THE APP


Customer Services
Copyright © 2025 Desertcart Holdings Limited
DOWNLOAD THE APP

🚀 Elevate your IoT game with the ultimate compact smart camera board!
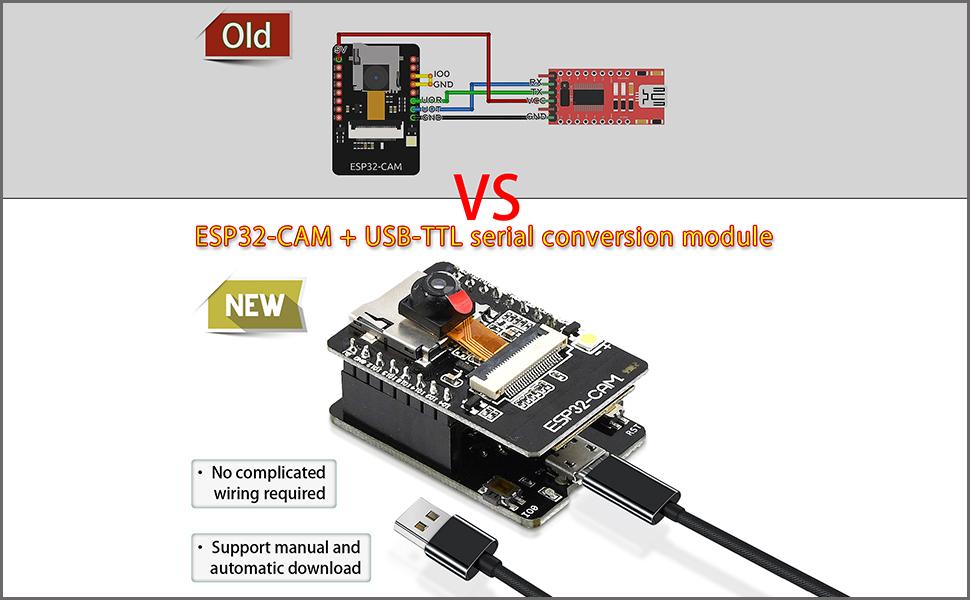
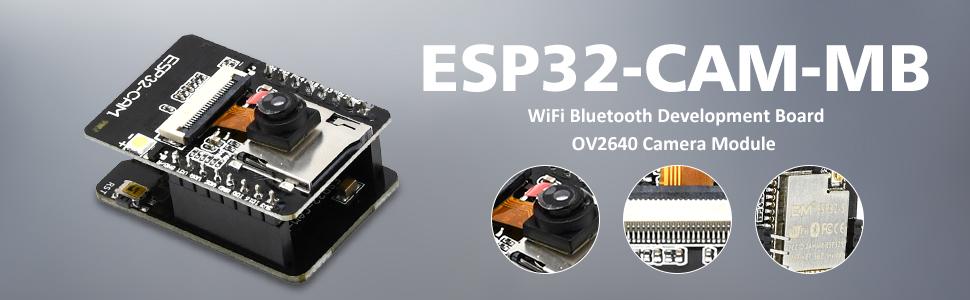
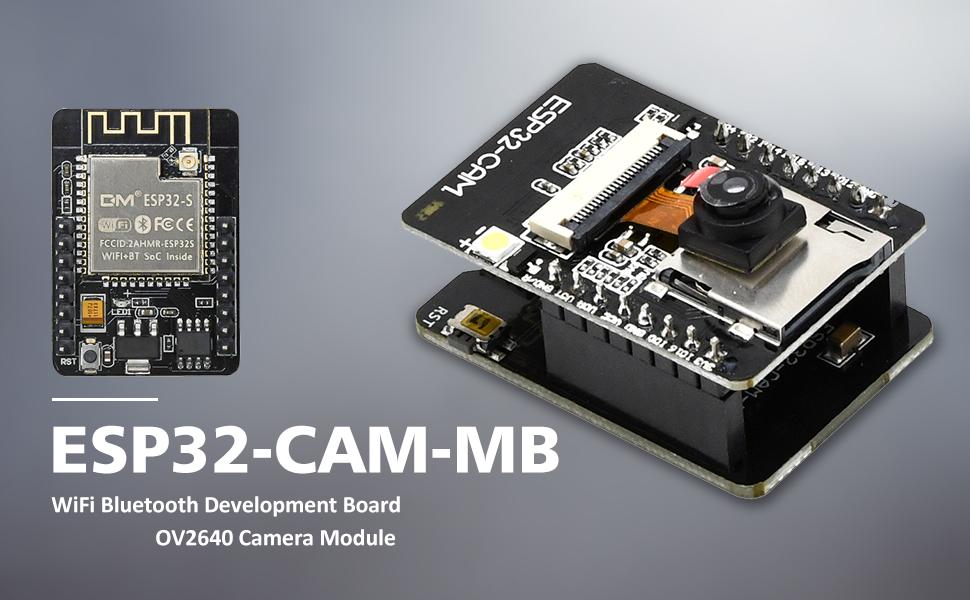
The Aideepen ESP32-CAM-MB is a compact, dual-core 240 MHz development board featuring a 2MP OV2640 camera, dual-mode Wi-Fi and Bluetooth connectivity, and ultra-low power consumption with deep sleep current as low as 6mA. Designed for seamless firmware updates via Micro USB and supporting NodeMCU, it’s ideal for professional-grade IoT and smart home projects requiring a small footprint and robust wireless performance.


| ASIN | B08P2578LV |
| Best Sellers Rank | #336 in Single Board Computers (Computers & Accessories) |
| Brand | Aideepen |
| CPU Speed | 240 MHz |
| Compatible Devices | OV2640, OV7670 cameras |
| Connectivity Technology | Bluetooth, I2C, Wi-Fi |
| Customer Reviews | 3.9 out of 5 stars 664 Reviews |
| Item Dimensions L x W x H | 1.06"L x 1.59"W x 0.18"H |
| Item Height | 4.5 millimeters |
| Manufacturer | Aideepen |
| Memory Storage Capacity | 4 MB |
| Model Name | ESP32-CAM-MB |
| Operating System | FreeRTOS |
| Processor Brand | Espressif |
| Processor Count | 2 |
| Processor Speed | 240 MHz |
| RAM Memory Installed | 520 KB |
| RAM Memory Technology | Internal, PSRAM |
| Ram Memory Installed Size | 520 KB |
| Total Usb Ports | 1 |
| Wireless Compability | 802.11b |
W**A
ESP32 are amazing and easy to use
I love this devices to build smart home devices. ESP32 very versatile and easy to use. Connectivity, quality are amazing for this small gadget
W**W
Camera model not supported.
One set worked and the other did not . I noticed one camera had OV2640 stamped on the ribbon and the other did not have any camera model stamped on it. I tried both cameras on both MB's and the unstamped camera would not work with either MB's. The working camera would not work on the MB that came with the unstamped camera. Please send another OV2640 and MB replacement. Sense my first review I have changed the rating from two to five. The refunded my purchase and I purchased the same items and they all worked as expected.
K**A
When They Work, All Good
The first twopack of the cams did not work. Code could be loaded, but the cameras were DOA. Amazon immediately replaced these, originals being returned. However, the second pair work perfectly - one as a stand-alone camera; the other has been integrated into Home Assistant using ESPHome for setup. Using the Arduino 2.4.6 IDE, the code automatically downloaded to the camera with no RST or button pushes required. Painless...and had the first two not failed, this would get five stars. The Home Assistant camera was manually set up, using a boilerplate .yaml file from ESPHome, listed below. The initial code is created using the ESPHome Wizard, specifying "esp32cam" from the list. The updated .yaml file is processed using the ESPhome Run command. Follows is a working .yaml file that allows the camera and it's "flashbulb" to be accessed in Home Assistant: ________________ # esp32_camera: external_clock: pin: GPIO0 frequency: 20MHz i2c_pins: sda: GPIO26 scl: GPIO27 data_pins: [GPIO5, GPIO18, GPIO19, GPIO21, GPIO36, GPIO39, GPIO34, GPIO35] # the order of the data_pins is significant, don't mix up the order vsync_pin: GPIO25 href_pin: GPIO23 pixel_clock_pin: GPIO22 power_down_pin: GPIO32 resolution: 800x600 name: esp_cam02 idle_framerate: 0.1fps output: - platform: ledc pin: GPIO4 channel: 2 # channel 1 is used for esp32_camera id: led light: - platform: monochromatic output: led name: espcam_02 light # ------------------------------------------- Have fun! Considering the price, if one has the application, these cameras are the ticket.
A**R
Not the same product as two years ago
I bought a pair of these ESP32 Cams in April 2022 based on the demonstration at the Dronebot Workshop on Youtube. Those two units worked perfectly and still are performing fine. Now that their functionality has been confirmed, I decided to go ahead a get a couple more because I have additional uses and a friend is also interested. Sadly, I can no longer recommend these devices from this vendor. Although I was able to successfully upload the Webserver sketch for the AIThinker version of the ESP32 Cam just as before, this time the performance is unacceptable on both units. Several phenomena occur. Sometimes, the unit just locks up, not responding to any of the settings or even starting the stream. Since these two units are the third and fourth ones that I have purchased, I'm confident that I'm doing everything correctly. In fact, once the code is uploaded and the IP address is provided in the serial monitor, I tried to "ping" the IP address to confirm that there was a device present. In both cases, the ping was slow and/or non-responsive. Whereas the typical ping time for the other units is typically about 30-50 ms with the previous units, with these two, the pings are hundreds of ms, even over 1000ms. Obviously this causes real problems with responsiveness. (And, yes, all this testing is done with the exact same connection cable, located in the exact same physical location, and connected to the same port on the same laptop.) Based on some of the reviews, I also tried one of the "old" MB boards with the new cam boards. In one case, it made the performance slightly better, but still no acceptable. In the other case, there was no improvement. And, when I reconnected the older CAM to the older MB, the excellent performance was restored. The performance problem is with these two new units. They will have to be returned tomorrow.
U**S
pretty good...
so far so good. picture quality is adequate for my needs. in the Arduino IDE choose AI Thinker ESP32-CAM in the board manager. hold the IO0 button and tap the RST button to put it into flash mode.
C**R
Use a Data rated USB Cable - not a charging cable or it will NOT work.
Worked as expected. Eventually. note: use a DATA rated USB cable - NOT JUST A POWER supply cable... I had two cables - both for charging things - neither had data - I didn't consider this and nothing would work. I installed drivers... chased after the wrong device... force installed drivers ... crashed windows... reloaded windows... finally asked ChatGPT.... first suggestion was ensure you are using a DATA CABLE... found a data cable for a kids tablet... AND they worked immediately and were recognized by windows... without installing any drivers.
D**N
A good microprocessong board held back by poor manufacturing and documentation.
The boards can work with enough effort, but the lack of any supporting documentation makes this a lot harder then it should be. The programming process itself is fairly easy, after you correctly setup the Arduino IDE, and the USBC port makes that part easy. I setup a copy of the esp32 home project to play with the camera and do some home assistant integration. 1 of the boards I received had a solder bridge on the receive line, and I had to get out a soldering iron to fix it. The onboard antenna is just awful, barely working in the same room as my wifi router. I had to once again get out the soldering iron to switch to a little antenna I had laying around and performance improved remarkably. Went from 30 seconds to load the 1600x1200 image to less then 1 second, and I could actually use it in another room. Additionally the boards I got seem to always enter in the bootloader mode on boot, and I have to press the reset button to get them to run my code. This is extremely inconvenient because any power disruption completely takes the board down. Without any schematics or user guide, it's not really possible to know if this is intended or just another design or manufacturing flaw, or how to easily fix it. The boards do work, and decently well when you get them running, but I would recommend going one of the other boards after the annoyances I had to manually fix.
R**.
Esp32 cam
Worked as advertised
Trustpilot
1 week ago
2 months ago