
🛏️ Elevate your space, maximize your lifestyle—sleep smart, live stylish.
The Deluxe Murphy Bed Frame (Twin) features a powder-coated alloy steel frame engineered to support up to 1,500 lbs. Designed for easy installation in under 90 minutes, it requires no cabinet, fitting seamlessly into closets or open walls. Premium European-style slats enhance mattress comfort and airflow, while a lifetime warranty guarantees lasting reliability. Ideal for professionals seeking a modern, space-saving solution without sacrificing durability or style.


| Best Sellers Rank | #954,324 in Home & Kitchen ( See Top 100 in Home & Kitchen ) #3,397 in Bed Frames |
| Color | White |
| Customer Reviews | 4.8 out of 5 stars 94 Reviews |
| Material | Alloy Steel |
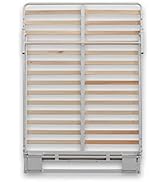
| Product Dimensions | 80"L x 38"W x 12"H |
| Size | Twin |
| Special Feature | Lightweight |
| Style | Modern |
B**M
Easy to put together and very sturdy!
I was able to put this together alone, though it may have been helpful to have another set of eyes on the instructions, which were not as clear as I'd have liked. I definitely made some mistakes along the way. More diagrams would have been great, but instead we only got 2 or 3 zoomed-out diagrams with parts labeled, rather than close-ups to demonstrate fit. I ended up having to unbolt and rebolt things a few times to get them in the right place/direction. In some cases, the pre-drilled holes were just a bit too tight for the screws, forcing me to drill into the frame to accommodate them. And the instructions for attaching the springs were useless. Ultimately, I found a video on the Wilding Wallbeds website that gave me a very helpful tip -- use a long screwdriver and leverage the cross beam to pull the springs up and onto the bedframe. This chipped the paint a bit, but worked. I also struggled to get the frame to attach to the wall. The screws provided are extremely long and my wall only has a few inches before one hits brick. So, I had to make some adjustments. I also needed a longer distance between the wall and the bed in order to accommodate a radiator (small room / no murphy bed cabinet). That meant that I was only able to bolt the wall mount and the base together using one bolt rather than two, which left the bed unstable and buckling when the bed was down. I'll have to add some wood spacers between the mount and the wall in order to make the work, ultimately. Otherwise, though, it is great. It's both stable and easy to lift and bring down. It provides good space underneath. And it's comfortable, providing great support throughout the night. Really happy with this purchase.
A**A
Love this murphy bed!
I wanted to install a murphy bed in a closet instead of purchasing an entire wall unit. This was perfect. It is very easy to pull down and push back up. And with closet doors closed, it is out of site and does not take up any additional space in our spare room.
A**N
Great Bed and Great Customer Service!
This Murphy bed will be used often for my guests but I need it out of the way to use the room as an office too! I read tons of reviews and went with the Wilding Wallbeds for the customer service, great directions, and value! I plan to build my own cabinet-shelves to ‘hide’ the bed. My brother-in-laws (2 ppl) put the bed together for me and I LOVE the sturdiness of the bed, comfort with the mattress I bought, and quick, personal, and super nice customer service that helped me with replacing a broken slat. In a world that increasingly doesn’t teach/promote customer service, this company deserves 5 stars for this alone (IMO). I will definitely order my next Murphy bed through this company!
K**H
Love this Wall Bed
Could not be more impressed. Easy to assemble. Highest quality product. Exceeded expectations. This is the way to get a wall bed. Great price for exceptional quality.
I**Z
Very, very nice.
The bed frame is sturdy and well-built with smooth pull-down movement. The tension is easy to adjust by adding or removing springs as needed. It was pretty easy to assemble and the support slats are also much sturdier than I expected. I really couldn't ask for more. It's a great frame for users looking to save space.
W**B
Queen size requires an opening Of at least 83 1/2 inches
Great Murphey Bed frame and hardware....WE assembled and installed in an existing closet 60x80(standard size opening) and discovered when we first lifted the bed that it would not fit thru the opening. Another reviewer had said that Amazon was incorrect in listing 83" as the height of the frame but that is exactly the measurement of our frame. If you look at the picture the frame from where it touches the floor to the top of the frame is just over 83". Luckily my husband is a DIY'er and we extended the height of the Closet, added 1 1/2 " to width, and replaced the door trim as well as the doors. A lot of work but worth it. The bed works great and is very easy to lift. (the missing slats in the picture are due to needing to have access for paintng and putting shelves in the closet) I really don't know why there was a difference in the height of our frame and the other reviewer!
S**I
Great bed. However, quality control could improve.
This Wilding folding bed is very nice and easy to operate. Assembly instructions are easy to understand. That said, I've only two recommendations for Wilding. Quality control could improve as the post attached to bed frame and one attached to the floor frame that are used to connect the leg extension rod/arm, were not spaced correctly on one side. So the rod couldn't be attached. (See Photo) Using a round rasp file, I was able to elongate the rod end holes a bit so it would slide on as indicated in the instructions. Secondly, the instructions say to attach the floor frame to the wall stud. Well given the design, this is not possible. The instructions should say "attach to the base or stud plate. Also, it's impossible to use all four screws if there's wall to wall carpet because of the subsequent carpet + tact strip thickness giving you only 1" of base plate to screw to instead of 1½". So basically, you can only use two screws on each side which seemed adequate to me given their size. I also highly recommend to pre-drill holes for those screws because they're large and will split the baseboard and perhaps wall plate too. Now, by no means should this stop anyone from purchasing this bed. I just think they need to address this in their instructions.
A**R
clears an 80" door jam inside a closet
The P200 is a nicely designed murphy frame that fits into closet with 2 x 36" doors easily. The 12" queen mattress mounted on frame will clear 80" door jam when rotated down from inside the closet. My 16 year old son put the assembly togethor in about 5 hours.
Trustpilot
2 months ago
3 weeks ago


