
DOWNLOAD THE APP


Customer Services
Copyright © 2025 Desertcart Holdings Limited
DOWNLOAD THE APP


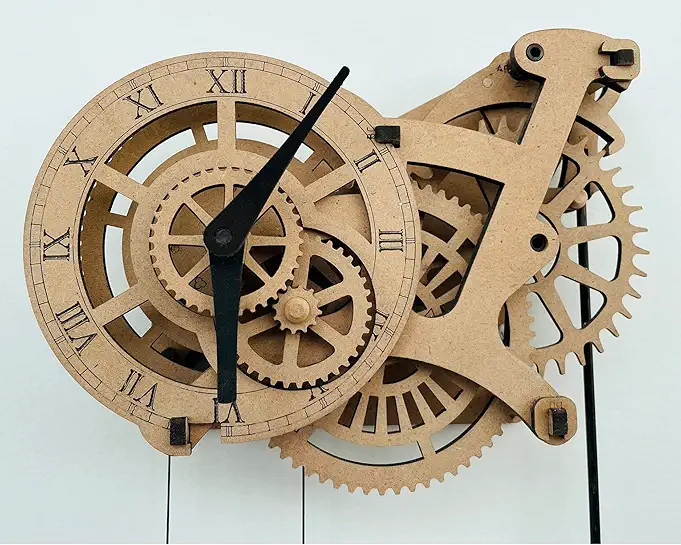

⏳ Build your own time, one gear at a time!
The ABONG Crossingham Wooden Gear Wall Clock Kit is a DIY model designed for first-time builders, featuring 99 precision laser-cut parts, a sustainable wood construction, and a unique steampunk aesthetic. With a 12-hour run time and easy-to-follow instructions, this clock kit combines craftsmanship with functionality, making it an ideal gift for woodworking enthusiasts.


| Item Weight | 1 Pounds |
| Item Dimensions W x H | 9"W x 6.75"H |
| Theme | Mechanical |
| Shape | Wheel |
| Clock Form | Pendulum |
| Dial Color | brown |
| Style | Dynamic Sculpture |
| Room Type | Living Room |
| Color | Natural Wood |
| Frame Material | Wood |
| Material | Wood |
| Warranty Type | Manufacturer's Warranty |
| Mounting Type | Wall Mount |
| Watch Movement | Mechanical |
| Operation Mode | Mechanical |
| Alarm Clock | No |
| Power Source | Counterweight |
| Indoor Outdoor Usage | Indoor |
| Batteries are Included | No |
| Display Type | Analog |
| Special Features | Working Gear Clock |
D**G
A GOOD INTRODUCTION TO WOOD GEAR CLOCKS
The media could not be loaded. A GOOD INTRODUCTION TO WOOD GEAR CLOCKSSUMMARY:This is a good clock kit for the beginning wood clock builder. However, this clock requires a modest amount of tools including a small razor saw, a hobby knife, glue and several sheets of sandpaper to complete successfully. Additionally, you must have a fair amount of patience and the ability to pay attention to small details. With only two driven gears, this clock has a good chance at a successful build by the beginning builder.PROS:1. Simple to assemble.2. Carbon fiber axles that are very strong and sized consistently.3. Large gear teeth that are easy to sand.4. Good fit between gears reduces the amount of sanding needed.5. Error tolerant design.6. Easy to read hands.7. The material used for the kit is a manufactured wood product similar to hardboard. It is a dimensionally stable material that removes easily from the waste material.8. Keeps fairly accurate time once adjusted!CONS:1. No written instructions included. Must download instructions online.2. Requires some sanding of the gears and cogs to allow them to fit with as little friction as possible. The gears have small teeth and will require a lot of patience to sand each one.3. Hardening of the gears needed to reduce friction and increase service life.4. Need to acquire tools if you don't have them already.5. The carbon fiber axles need to be cut to size. The carbon fiber axles can splinter and be a hazard. The carbon fiber dust is also a hazard that needs to be controlled.6. Need to acquire material for the drive weight.7. The material used for the frame and gears is a manufactured wood product similar to hardboard. While stable, it is somewhat brittle and does not have the same strength as plywood.8. The rewinding mechanism is awkward.BUILD TIPS:1. I used a good hobby quality cyanoacrylate (superglue) adhesive in thin and medium viscosity with a fine applicator tip throughout the build to avoid waiting for a wood glue to set. If you haven't used CA glue before, practice on some scrap bits to judge how long it takes to set.2. I hardened all the gear teeth with a drop of thin CA and then sanded each tooth until almost all the brown resin from the laser cutting process was removed. I did this before I started assembling the gear sets. This takes a fair amount of time. Hardening the teeth reduces friction and will reduce wear on the teeth. This step is especially important as the hardboard material can fray under continuous friction.3. The gear holes might need to be drilled out to fit the axles. This requires a 6 mm drill bit. I had to drill out almost all the axle holes to fit the4. I used wax for lubrication on the end of the carbon fiber axles and the bearing holes in the frame. I used a small birthday candle to wax the holes after hardening with thin CA. I burnished the wax in by inserting a wood dowel that was slightly smaller than the hole and spinning it against the sides of the hole. Make sure the axles are a slightly loose fit in the holes.5. I used the wooden washers to locate the gears on the axles but did not glue them in place until AFTER the clock had been fully assembled. This allowed the gears to be slid on the axle shafts to allow proper clearance between gears. Only after I was satisfied with the gear spacing did I glue the washers in place on the axles to fix the gear positions. Make sure all gears spin as freely as possible and don't wobble. Also check to ensure there is no interference between contacting gear teeth. A little clearance is ok.6. I triple checked to make sure all axles were perpendicular to the baseplate, parallel to each other and firmly glued to the axles. Be careful NOT to glue the rewind mechanism to the axle.7. Take care to reduce friction wherever possible. I was able to get my clock running as soon as I hung the drive weight filled with 4 pounds of lead. With some fine tuning, my clock will tick reliably with just under 3 pounds of weight.8. Overall, it took me about 22 hours to build this clock - 10 hours were spent on sanding, 10 hours on fitting and assembly and a couple of hours for tuning. I had to slightly reshape some of the teeth on the escapement as the clock wasn’t ticking with a consistent tempo.RATING: Five Stars.Overall it was a fun and satisfying build. The material is easy to work with but lacks the charm of real wood grain. With only two driven gears, this clock is easier to build successfully.
C**I
I did not get instructions to make clock
No instructions I have no idea how to make clock
E**G
Fun
FUN
R**Z
Easy to assemble
Very easy to put together, plus really easy instructions to follow
C**K
Paperweight for your wall!
I've got a masters degree in engineering and couldn't make this work! I've built beds,toy chests, dressers and this was absolutely impossible.The parts were doomed from the start. Step 1: cut these tiny tubes of carbon fiber. Really? The pendulum, the thing that runs the clock, simply didn't fit, swing freely, or move the gears.Can't tell you how disappointed I am after spending 16 hours on this (don't believe the 8 they say!) Sanding, cutting, dremeling, gluing!DO NOT WASTE YOUR TIME!Pardon the pun!
J**1
Looks good
Haven’t been able to set down and get started.Nor even download the directions. They are digital only. So if you like a visual image larger than your phone screen you’ll need to download and print.
S**R
Missing Parts
I am missing the entire large A parts punch out... just opened it after having it for several months.. can't find anyway to contact Abong on their web site.... this is very disappointing. Many of the parts had been punched out already so this was likely a return. Sorry I purchased this at all
D**C
too much to do
when they include pre cut axels i might try it again, but no glue no sandpaper and no saw no thanks
Trustpilot
4 days ago
2 weeks ago